
Hi friends!
It was the last week of school over here, and we are officially heading into summer. I got to go to Alice’s end-of-year picnic, we wrapped up the last school pickups, and now we are settling into that summer rhythm where the kids are home, the days feel fuller, and everyone seems to be hungry all the time.
This is also the time of year when having a few prepped meals in the fridge makes such a big difference. Between pool days, camps, work, errands, and later summer nights, I love having meals ready that we can grab quickly without having to stop and cook from scratch every time someone needs to eat.
This week’s meal prep is mainly for my husband and me. My kids are home for summer and their meals tend to look a little different, which is why you’ve been seeing more of my Good Enough Plates on social media lately. While I’m focusing on simple, low-prep lunches for the kids, my husband especially appreciates having grab-and-go breakfasts and lunches ready for the week. Having a few balanced options prepped ahead makes it so much easier for both of us to stay fueled during busy days, while still leaving plenty of flexibility for the rest of the family’s meals.
This week’s Sunday meal prep includes five easy make-ahead recipes including high protein breakfast burritos, peaches and cream chia pudding, Mediterranean pasta salad, frozen yogurt bark, and homemade juice shots.
Click the play button below to watch this week’s full Sunday meal prep video and see exactly how I made everything.
What I Prepped for this Sunday Meal Prep
Here’s everything I prepped for this week’s Sunday Meal Prep menu:
- Carrot Apple Ginger Juice Shots
- High Protein Peaches and Cream Chia Pudding
- Mediterranean Chickpea Pasta Salad
- High Protein Breakfast Burritos
- Frozen Greek Yogurt Berry Bark
Kitchen Tools, Equipment, and Containers I Used
Below are the exact kitchen tools, meal prep containers, and appliances I used to prep this week’s recipes.
- Chef knife (olive wood handle)
- Cutting board
- Veggie chopper
- Cold press juicer
- Juice glass jars for storage
- Blender
- Meal prep jars (used for chia pudding)
- Measuring glass cup
- Measuring spoons
- Silver & gold pot and pan set
- Vacuum sealer (you need this if you are purchasing the vacuum sealing bowl)
- Vacuum sealing large glass bowl
- ZWILLING Fresh & Save BOWLS 5-pc Accessory Set
- Colander
- Ceramic juicer
- Stainless Steel pan (cooked ground beef in)
- Stainless Steel mixing bowls
- Green oven pan/griddle
- Hi friends!
- What I Prepped for this Sunday Meal Prep
- Kitchen Tools, Equipment, and Containers I Used
- Carrot Apple Ginger Juice Shots
- Carrot Apple Ginger Juice Shots
- High Protein Peaches and Cream Chia Pudding
- High Protein Peaches and Cream Chia Pudding
- Mediterranean Chickpea Pasta Salad
- Mediterranean Chickpea Pasta Salad
- High Protein Breakfast Burritos
- High Protein Breakfast Burritos
- Frozen Greek Yogurt Berry Bark
- Frozen Greek Yogurt Berry Bark
- Final Thoughts
- More Sunday Meal Prep Blog Posts:
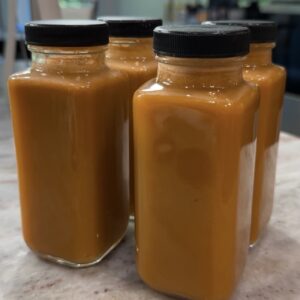
Carrot Apple Ginger Juice Shots
These Carrot Apple Ginger Juice Shots are a refreshing way to add more fruits and vegetables to your week. Made with carrots, green apples, cucumber, lemon, and fresh ginger, they are so refreshing and easy to prep ahead for busy mornings.
I love making a batch at the beginning of the week and storing them in small jars in the fridge. While no single food is going to transform your health overnight, these wellness shots are an easy way to increase your fruit and vegetable intake and add variety to your weekly meal prep routine. And something about having a juice shot in the morning will have you feeling like you have your life together, amiright.

Serves
6 to 8 shots
Grocery List
- 6 carrots
- 2 green apples
- 2 cucumbers
- 1 lemon
- 1 inch fresh ginger
Why You’ll Love This Recipe
- Easy way to add more fruits and vegetables to your day
- Refreshing and lightly sweet
- Great for meal prep
- Made with simple ingredients
- Stores well in the refrigerator
Customization and Tips
- Add an orange for a sweeter flavor
- Use less ginger if you prefer a milder taste
- Serve over ice as a larger juice
- If you do not have a juicer, blend and strain through a fine mesh sieve
- Adjust the amount of lemon based on your preference
Nutrition Info
These wellness shots provide vitamins, minerals, and antioxidants from a variety of fruits and vegetables. Carrots provide beta-carotene, while apples, cucumber, lemon, and ginger contribute additional plant compounds that support overall health. They are a simple way to add more produce to your day and support overall dietary variety.
Storage and Reheating
- Store in airtight jars or containers in the refrigerator for up to 4 days
- Shake well before serving as natural separation may occur
- Best served cold
Carrot Apple Ginger Juice Shots
Equipment
Ingredients
- 6 carrots
- 2 green apples
- 2 cucumbers
- 1 lemon peeled
- 1 inch fresh ginger
Instructions
- Wash all produce thoroughly.
- Cut the carrots, apples, cucumbers, lemon, and ginger into pieces that fit your juicer.
- Run all ingredients through a juicer according to the manufacturer's instructions.
- Stir the juice to combine. Pour into small jars or containers and refrigerate until ready to enjoy.
Notes
- Store in airtight jars in the refrigerator for up to 4 days.
- Shake well before serving as natural separation may occur.
- For a milder flavor, reduce the amount of ginger.
- Serve chilled.
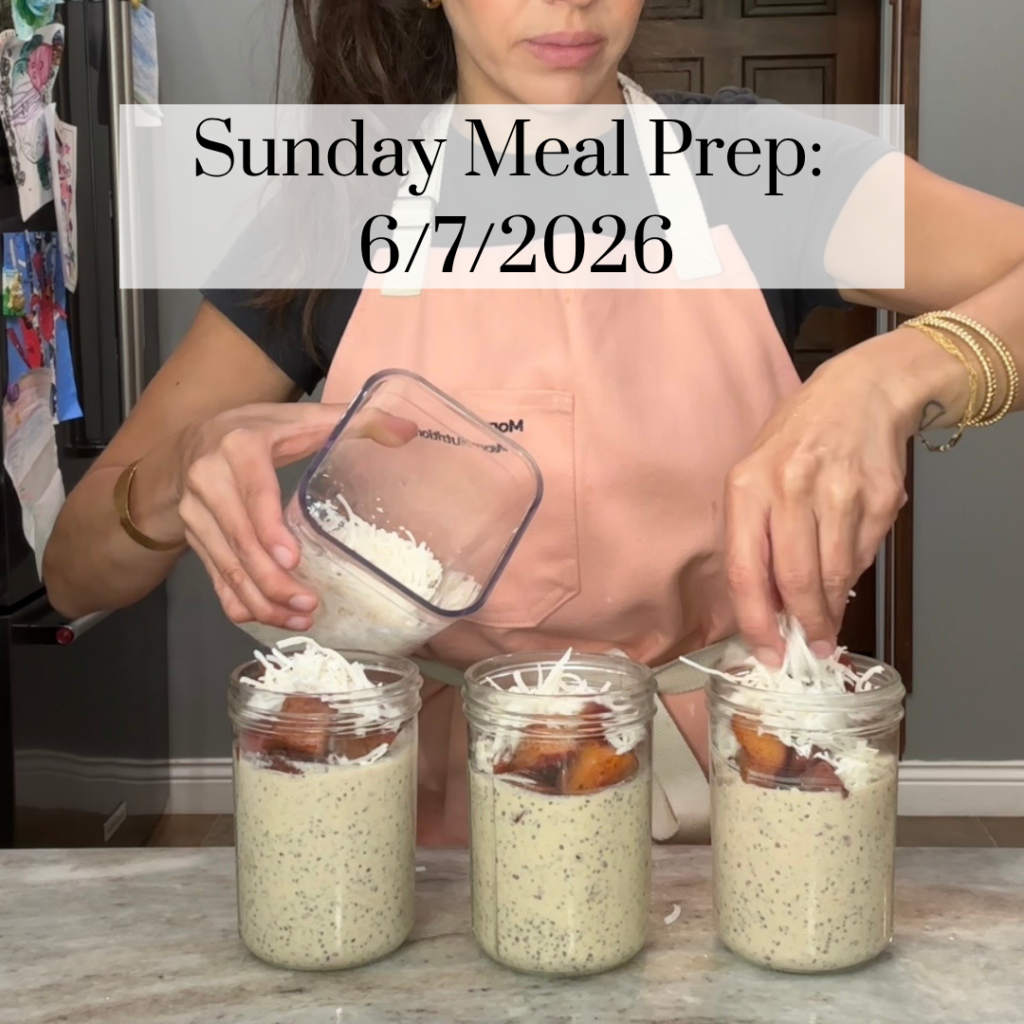
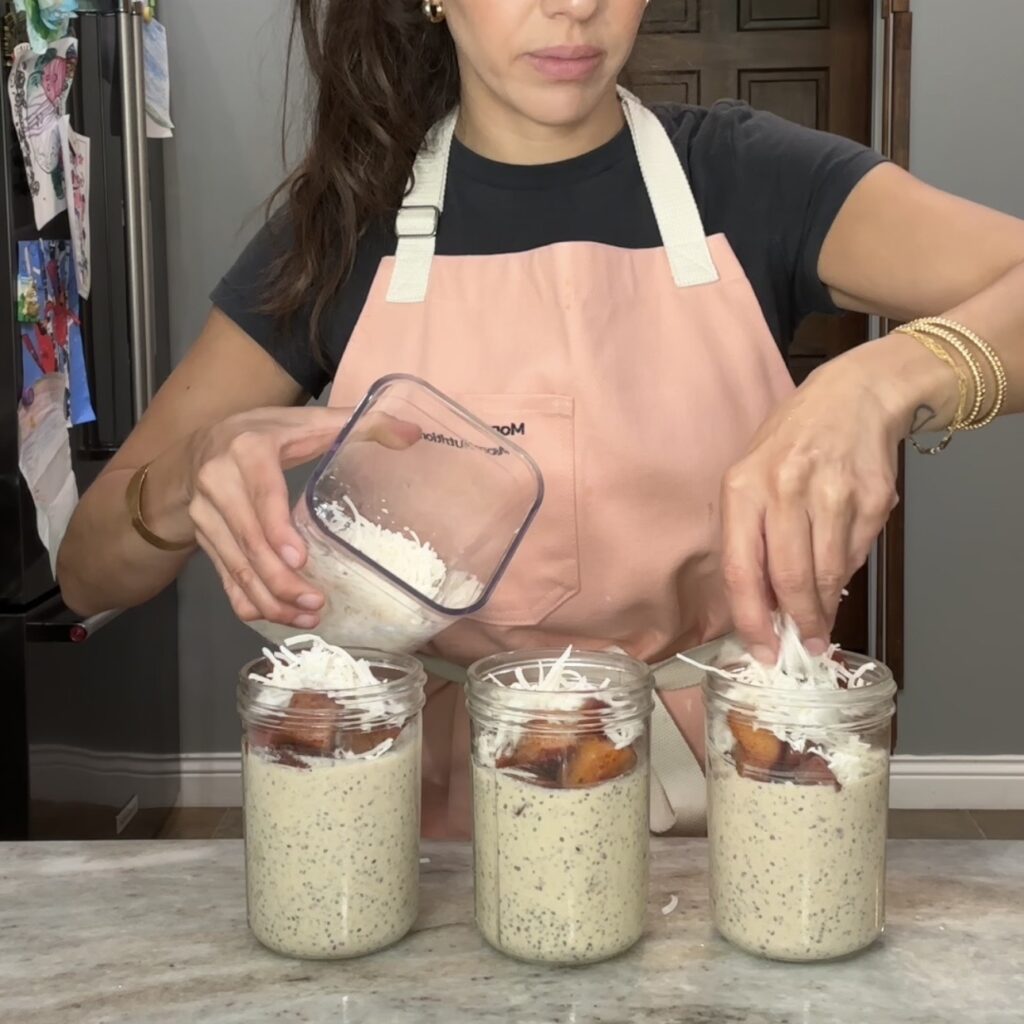
High Protein Peaches and Cream Chia Pudding
This High Protein Peaches and Cream Chia Pudding is creamy, filling, and perfect for meal prep breakfasts or snacks. Fresh peaches are blended with Greek yogurt and milk to create a naturally sweet peaches-and-cream base, while chia seeds help thicken the mixture and add fiber.
To make it even more delicious, I top each jar with a simple cinnamon peach topping made by cooking fresh peaches until soft and jammy. Finished with a sprinkle of coconut flakes, this recipe is definitely summer in a jar.
Serves
4 servings
Grocery List
- 4 peaches, divided
- Plain Greek yogurt
- Milk of choice
- Vanilla protein powder (optional)
- Chia seeds
- Vanilla extract
- Cinnamon
- Unsweetened coconut flakes
Why You’ll Love This Recipe
- High in protein and fiber
- Perfect for meal prep breakfasts
- Made with fresh summer peaches
- Naturally sweet and creamy
- Easy to customize
- Stores well in the refrigerator
Customization and Tips
- Use vanilla Greek yogurt for a sweeter flavor.
- Swap peaches for nectarines or apricots.
- Top with chopped nuts for extra crunch.
- If you prefer not to use protein powder, simply omit it and increase the Greek yogurt. You can also blend in cottage cheese for additional protein.
- Add a drizzle of maple syrup if you prefer a sweeter pudding.
- Use dairy-free yogurt and milk if needed.
Nutrition Info
This chia pudding provides a balanced combination of protein, fiber, and healthy fats to help keep you full and satisfied. The Greek yogurt and protein powder contribute protein, while the chia seeds provide fiber and omega-3 fats. Peaches add natural sweetness along with vitamins and antioxidants.
Storage and Reheating
- Store in airtight jars or containers in the refrigerator for up to 4 days.
- Best served cold.
- The pudding will continue to thicken as it sits.
- Stir before serving if needed.

High Protein Peaches and Cream Chia Pudding
Ingredients
For the Chia Pudding
- 2 peaches chopped
- 1 cup Greek yogurt plain
- 2 cups milk of choice
- 1 scoop vanilla protein powder
- 1 tsp vanilla extract
- 8 tbsp chia seeds (2 tablespoons per jar)
For the Peach Topping
- 2 peaches diced
- 2 tbsp water
- 1 tsp cinnamon
For Serving
- Unsweetened coconut flakes
Instructions
- Add the peaches, Greek yogurt, milk, vanilla protein powder, and vanilla extract to a high-speed blender. Blend until smooth.
- Place 2 tablespoons of chia seeds into each meal prep jar.
- Divide the peach mixture evenly among the jars and stir well.
- Meanwhile, add the diced peaches, water, and cinnamon to a small saucepan.
- Cook over medium heat until the peaches are soft and jammy, about 8 to 10 minutes.
- Allow the peach topping to cool completely.
- Top each chia pudding jar with the peach mixture and a sprinkle of coconut flakes before serving.
- Refrigerate for at least 4 hours or overnight.
Notes
- Store in the refrigerator for up to 4 days.
- Omit the protein powder if desired and increase the Greek yogurt for additional protein.
- Cottage cheese can also be blended into the base for extra protein.
- Best served cold.
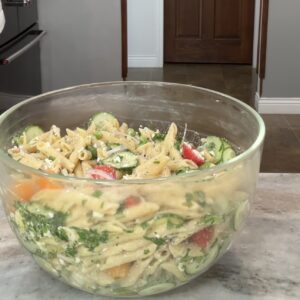
Mediterranean Chickpea Pasta Salad
This Mediterranean Chickpea Pasta Salad is one of those meal prep recipes that gets even better after sitting in the refrigerator for a few hours. Made with protein pasta, crisp vegetables, feta cheese, olives, fresh parsley, and a simple lemon dressing, it’s packed with flavor while still being easy to throw together.
I love having a big batch of this in the fridge for lunches throughout the week. It has a great balance of protein, fiber, healthy fats, and fresh vegetables, making it a filling and satisfying option for busy days.

Serves
6 servings
Grocery List
- 1 box Barilla Protein+ Penne Pasta
- 1 large cucumber
- 1 pint cherry tomatoes
- ½ medium red onion
- 1 cup feta cheese
- ¾ cup green olives
- ½ cup fresh parsley
For the Dressing
- ⅓ cup olive oil
- Juice of 2 lemons
- 1 garlic clove, minced
- 1 teaspoon dried oregano
- ½ teaspoon salt
- ¼ teaspoon black pepper
Why You’ll Love This Recipe
- High in protein and fiber
- Perfect for meal prep lunches
- Packed with Mediterranean flavors
- Gets even better as it sits
- Easy to customize with ingredients you already have
- Can be served as a main dish or side dish
Customization and Tips
- Swap the feta for parmesan or goat cheese if preferred.
- Add chickpeas or white beans for additional fiber and protein.
- Use fresh dill or basil in addition to the parsley.
- If the pasta absorbs some of the dressing after chilling, add a squeeze of lemon juice before serving.
- Allow the pasta to cool before mixing with the vegetables to keep everything crisp.
Nutrition Info
This pasta salad provides a balanced combination of protein, fiber, healthy fats, and vegetables. The Barilla Protein+ pasta helps increase the protein content, while the vegetables, olives, and feta add flavor, texture, and important nutrients. It’s a satisfying meal prep option that can help support fullness throughout the day.
Storage and Reheating
- Store in an airtight container in the refrigerator for up to 4 days.
- Best served cold or at room temperature.
- Stir before serving and add a squeeze of fresh lemon juice if desired.
Meal Prep Tip
One thing that has made a huge difference in keeping my meal prep salads fresh is storing them in my Zwilling Fresh & Save vacuum containers. For this recipe, I used the Fresh & Save bowl along with the accessory set to slice the cucumber and red onion directly into the bowl before vacuum sealing it.
I find that vacuum sealing helps keep ingredients fresh longer, which is so helpful for salads and meal prep lunches that I plan to eat throughout the week. It’s one of my favorite ways to keep vegetables crisp and reduce food waste.
Mediterranean Chickpea Pasta Salad
Ingredients
- 1 box Barilla Protein+ Penne Pasta
- 1 large cucumber thinly sliced
- 1 pint cherry tomatoes halved
- 1/2 medium red onion finely sliced
- 1 cup feta cheese crumbled
- 3/4 cup green olives sliced
- 1/2 cup fresh parsley chopped
Dressing
- 1/3 cup olive oil
- Juice of 2 lemons
- 1 clove garlic minced
- 1 tsp dried oregano
- 1/2 tsp salt
- 1/4 tsp black pepper
Instructions
- Cook the pasta according to package directions. Drain and rinse under cold water to cool completely.
- In a small bowl or jar, whisk together the olive oil, lemon juice, garlic, oregano, salt, and black pepper.
- In a large mixing bowl, combine the cooled pasta, cucumber, cherry tomatoes, red onion, feta cheese, olives, and parsley.
- Pour the dressing over the salad and toss until evenly coated. Taste and adjust seasoning if needed. Refrigerate until ready to serve.
Notes
- This salad tastes even better after chilling for a few hours.
- Store in the refrigerator for up to 4 days.
- Add an extra squeeze of lemon juice before serving if desired.
High Protein Breakfast Burritos
These High Protein Breakfast Burritos are one of my husband’s favorite things I meal prep. He loves having them ready to grab during the week, and I love knowing there’s a balanced option waiting for him when life gets busy. Made with eggs, lean ground beef, black beans, cheese, and chipotle sauce, they’re packed with protein, fiber, and flavor and reheat perfectly from the refrigerator or freezer.

Serves
6 burritos
Grocery List
- Large whole wheat burrito tortillas
- Eggs
- Greek yogurt
- Milk
- Fresh spinach
- Lean ground beef or turkey
- Yellow onion
- Taco seasoning
- Black beans
- Chipotle Bitchin’ Sauce
- Shredded Mexican cheese blend
Why You’ll Love This Recipe
- High in protein
- Perfect for meal prep
- Freezer friendly
- Easy grab-and-go breakfast
- Reheats well in the microwave, air fryer, or stovetop
- Great for busy mornings
Customization and Tips
- Use ground turkey or lean ground beef.
- Add diced bell peppers or mushrooms to the meat mixture for additional vegetables.
- Swap the chipotle sauce for salsa if serving immediately.
- Let the eggs cool slightly before assembling the burritos.
- Wrap individually in parchment paper before storing.
Nutrition Info
These breakfast burritos provide a balanced combination of protein, carbohydrates, and healthy fats to help keep you full throughout the morning. The eggs, beef, black beans, Greek yogurt, and cheese all contribute protein, while the black beans and whole wheat tortilla provide fiber to help support fullness.
Storage and Reheating
- Store in the refrigerator for up to 4 days.
- Freeze for up to 3 months.
To Reheat From Refrigerated:
- Microwave: 1 to 2 minutes until warmed through.
- Air Fryer: 350°F for 5 to 7 minutes.
- Stovetop: Heat in a skillet over medium-low heat for 3 to 4 minutes per side.
To Reheat From Frozen:
- Microwave: 3 to 4 minutes, flipping halfway through.
- Air Fryer: 350°F for 12 to 15 minutes.
- Stovetop: Thaw overnight in the refrigerator first, then heat in a skillet.
Meal Prep Tip
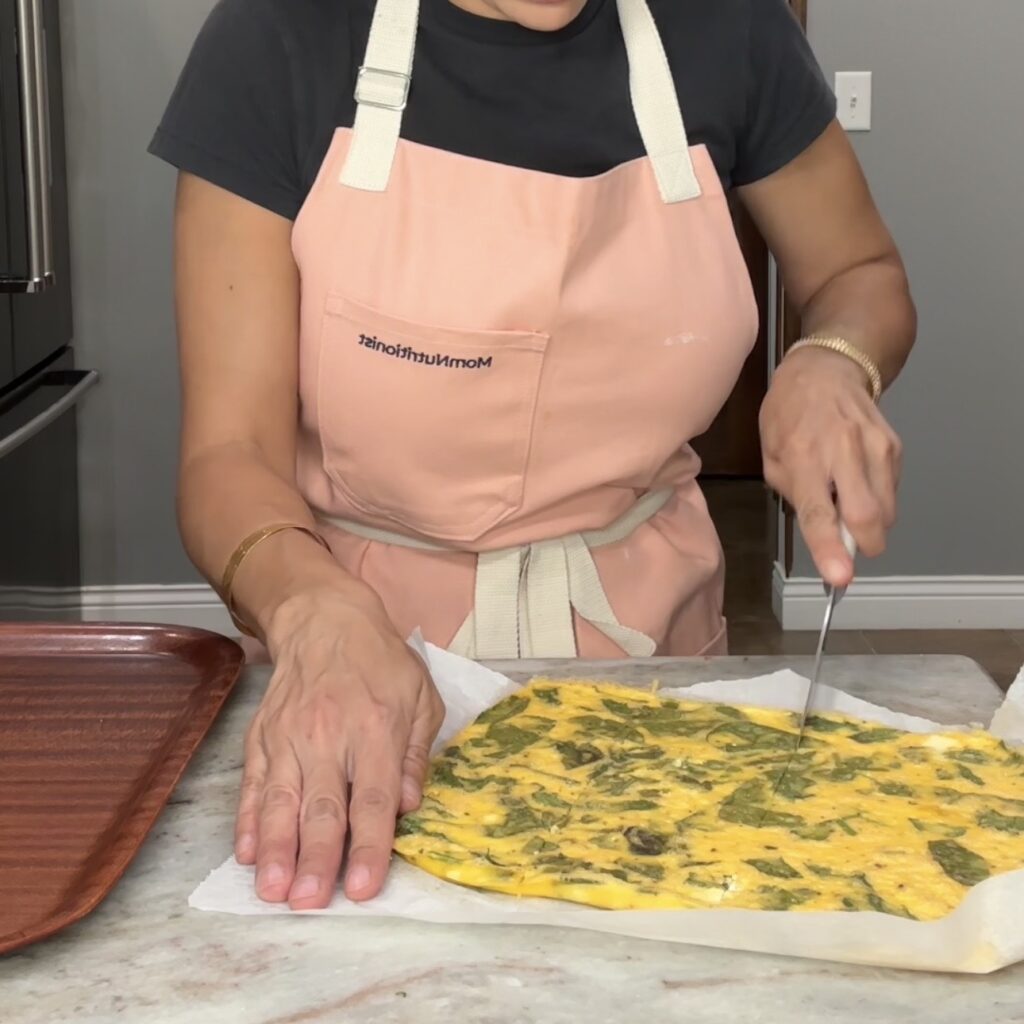
One of my favorite meal prep shortcuts for breakfast burritos is making the eggs on a sheet pan instead of standing at the stove scrambling them. I whisked together eggs, Greek yogurt, milk, spinach, and seasonings, then poured the mixture onto a parchment-lined sheet pan and baked it until set.
Once cooled, I simply cut the eggs into rectangles and added one piece to each burrito. The parchment paper makes cleanup incredibly easy, and the sheet pan method helps create evenly sized egg portions for every burrito.
I wrapped each burrito in parchment paper before storing them in an airtight container. This makes them easy to grab throughout the week and helps keep them from sticking together in the freezer.

High Protein Breakfast Burritos
Ingredients
For the Egg Layer
- 6 large eggs
- 1/2 cup Greek yogurt plain
- 1/4 cup milk
- 2 cups roughly chopped spinach
- 1/2 tsp salt
- 1/4 tsp black pepper
- 1/2 tsp garlic powder
For the Meat Layer
- 1 lb lean ground beef or turkey
- 1/2 medium onion diced
- 1-2 tbsp taco seasoning
- 1 can black beans 15-ounce
For Assembly
- 6 large whole wheat tortillas
- 1/2 cup Chipotle Bitchin' Sauce
- 1 1/2 cups shredded Mexican cheese
Instructions
- Preheat the oven to 400°F and line a sheet pan with parchment paper.
- In a large bowl, whisk together the eggs, Greek yogurt, milk, spinach, salt, pepper, and garlic powder.
- Pour onto the prepared sheet pan and bake for 12 to 15 minutes, or until the eggs are set.
- While the eggs bake, cook the onion in a skillet over medium heat until softened. Add the ground beef or turkey and cook until browned. Stir in the taco seasoning and black beans and cook for 2 to 3 minutes until heated through.
- Allow the eggs to cool slightly, then cut into 6 rectangles.
- Lay out the tortillas and spread about 1 tablespoon of Chipotle Bitchin' Sauce on each tortilla. Top with the meat mixture, one piece of egg, and shredded cheese. Roll tightly into burritos. Wrap individually in parchment paper and store in the refrigerator or freezer.
Notes
- Refrigerate for up to 4 days.
- Freeze for up to 3 months.
- Great for grab-and-go breakfasts.
- Reheats well in the microwave, air fryer, or stovetop.
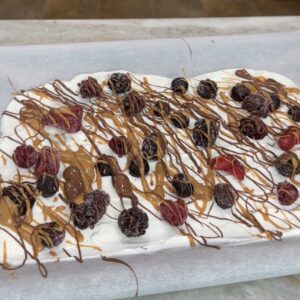
Frozen Greek Yogurt Berry Bark
This Frozen Greek Yogurt Berry Bark is one of my favorite meal prep snacks for the warmer months. Made with creamy Greek yogurt, mixed berries, peanut butter, and a drizzle of chocolate, it’s refreshing, satisfying, and feels like a treat while still providing protein and fiber.
I love keeping a batch in the freezer for those afternoons when I want something sweet. It’s easy to make, easy to customize, and perfect for hot summer days when you want a cold snack ready to grab and enjoy.

Serves
8 servings
Grocery List
- Plain Greek yogurt
- Frozen mixed berries
- Peanut butter
- Chocolate chips
Why You’ll Love This Recipe
- High in protein
- Perfect make-ahead snack
- Great for warm weather
- Easy to customize
- Made with simple ingredients
- Satisfies a sweet craving while providing protein and fiber
Customization and Tips
- Use vanilla Greek yogurt for a sweeter flavor.
- Add a drizzle of honey or maple syrup if you’d like additional sweetness.
- Swap the peanut butter for almond butter or cashew butter.
- Use dark chocolate chips, milk chocolate chips, or semi-sweet chocolate chips.
- Add chopped nuts, coconut flakes, or granola for extra texture.
- Any berry combination works well in this recipe.
Nutrition Info
This snack provides protein from Greek yogurt, fiber from berries, and healthy fats from peanut butter. It’s a balanced option that can help keep you satisfied between meals while still feeling like a fun treat.
Storage and Reheating
- Store in an airtight container in the freezer for up to 3 months.
- Place parchment paper between layers if stacking pieces.
- Allow the bark to sit at room temperature for 2 to 3 minutes before eating if desired.
- Best enjoyed straight from the freezer.
Meal Prep Tip
Line your sheet pan or tray with parchment paper before spreading the yogurt mixture. Not only does it make cleanup easier, but it also allows the bark to release easily once frozen so you can break it into pieces without sticking.
Frozen Greek Yogurt Berry Bark
Ingredients
- 2 cups Greek yogurt plain
- 2 cups frozen or fresh berries of choice
- 2 tbsp peanut butter
- 2 tbsp chocolate chips
Instructions
- Line a sheet pan or tray with parchment paper.
- Spread the Greek yogurt into an even layer about ¼-inch thick.
- Sprinkle the mixed berries evenly over the yogurt.
- Microwave the peanut butter and chocolate in 15-second intervals until smooth and drizzle over the yogurt.
- Transfer to the freezer and freeze for about 3 hours, or until completely firm. Break into pieces and enjoy.
Notes
- Add honey or maple syrup if you’d like a sweeter bark.
- Store in the freezer for up to 3 months.
- Place parchment paper between layers to prevent sticking.
- Great for meal prep and summer snacking.
Final Thoughts
I hope this week’s Sunday meal prep gives you some inspiration for simple breakfasts, lunches, and snacks as we head into summer.
With the kids officially home from school, having a few meals and snacks prepped ahead of time feels more important than ever. Between pool days, summer activities, work, and everything else that comes with this season, having options ready to grab from the refrigerator or freezer can make busy days feel so much easier.
This week’s meal prep was primarily focused on my husband and me. My husband especially appreciates having grab-and-go breakfasts and lunches ready throughout the week, and I love knowing there are balanced options available when we need them. From the breakfast burritos and chia pudding to the pasta salad and frozen yogurt bark, these recipes help make nourishing ourselves a little more convenient.
One of my favorite things about meal prep is that it doesn’t have to be complicated to be helpful. Even preparing a few recipes ahead of time can save time, reduce stress, and make it easier to enjoy balanced meals throughout the week.
If you try any of these recipes, I’d love to see! Be sure to tag me on Instagram at @momnutritionist so I can see your recreations and share them on my stories.
Looking for more meal prep inspiration? Browse some of my previous Sunday Meal Prep posts below.