
Hi Friends!
It’s been a very crazy busy summer with house projects, kids camps, family visiting, and the 2026 Mom Planner order arriving into the warehouse, also known as my garage. Between all of that, life has felt full in the best way, but it also meant I had to put some of my content creation on pause.
Now that things have started to slow down and fall back into a routine, I’m excited to get back into the swing of things here. The kids are officially back in school, the house feels a little quieter, and I’ve been able to carve out some space again for cooking, writing, and sharing.
I’m looking forward to settling back into these weekly posts and meal preps, which always help set the tone for the week ahead.
Before we get into it though, I thought I’d share some tips for those who are just getting into meal prep. Here are a few things that help me:
- Pick 3–5 recipes instead of trying to prep everything at once. A couple of breakfasts, a protein, a salad, and a snack usually cover the bases.
- Multitask while cooking. Roast or bake something in the oven while you cook on the stovetop. It saves time and makes cleanup easier.
- Always start with what takes longest. For me, that’s usually grains or proteins — once those are going, you can work on chopping veggies or blending sauces.
- Make storage easy. Portion into jars or containers right away so you can grab and go during the week.
- Leave room for flexibility. Prepped food should make life easier, not box you in. I like keeping things versatile so I can mix and match depending on what I’m in the mood for.
Here’s what my weekly routine usually looks like:
- Thursday: I sit down and write out what I want to make for the following week, then I build my grocery list.
- Friday: Grocery shopping day. I like having everything ready to go before the weekend really kicks in & while the kids are in school.
- Sunday: Meal prep day. I usually spend about 2 hours in the kitchen — starting with whatever takes the longest to cook, then layering in quicker recipes while things are baking or cooling.
This flow keeps meal prep manageable and stress-free, while making sure I actually use what I buy.
I hope this week’s lineup gives you some inspiration to keep your own fridge stocked with nourishing options. If you try any of these recipes, let me know how they turn out — I always love seeing your tweaks and variations.
Alright, let’s go!

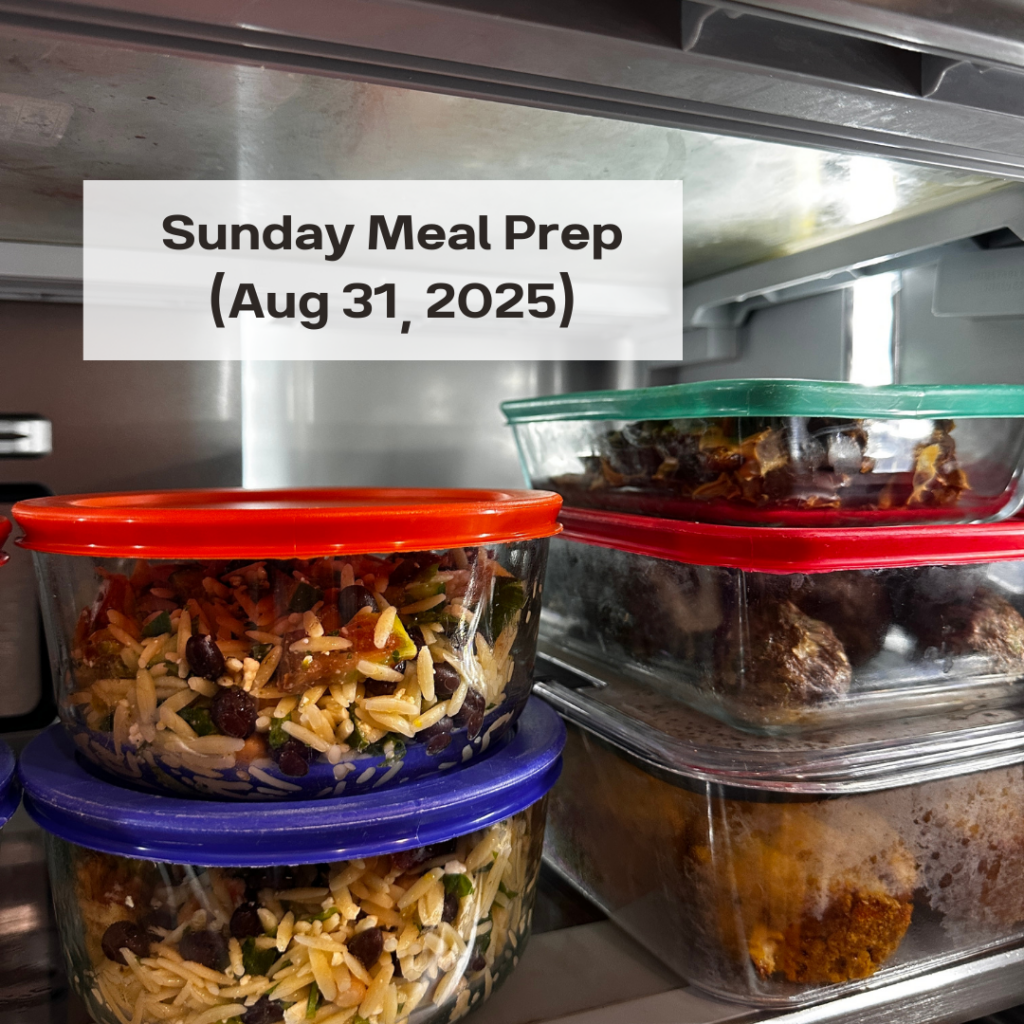
Here’s what I prepped for the week ahead:
- Blueberry chia pudding
- High protein pumpkin muffins
- Kafta meatballs
- High protein, high fiber Mediterranean orzo salad
- Date snickers bars
Kitchen Tools/ Equipment/ Containers I used:
- Chia Seed Pudding Containers
- High-speed blender
- Muffin tin
- Large chef’s knife
- Food processor
- Salad spinner
- Large Bowl (I used to mix the pasta salad in)
- Veggie chopper
- Citrus juicer (I bought mine at HomeGoods, but for the money, this is a better option: here )
- Pasta Salad Containers
- Glass storage containers
- Saucepan I made the orzo in
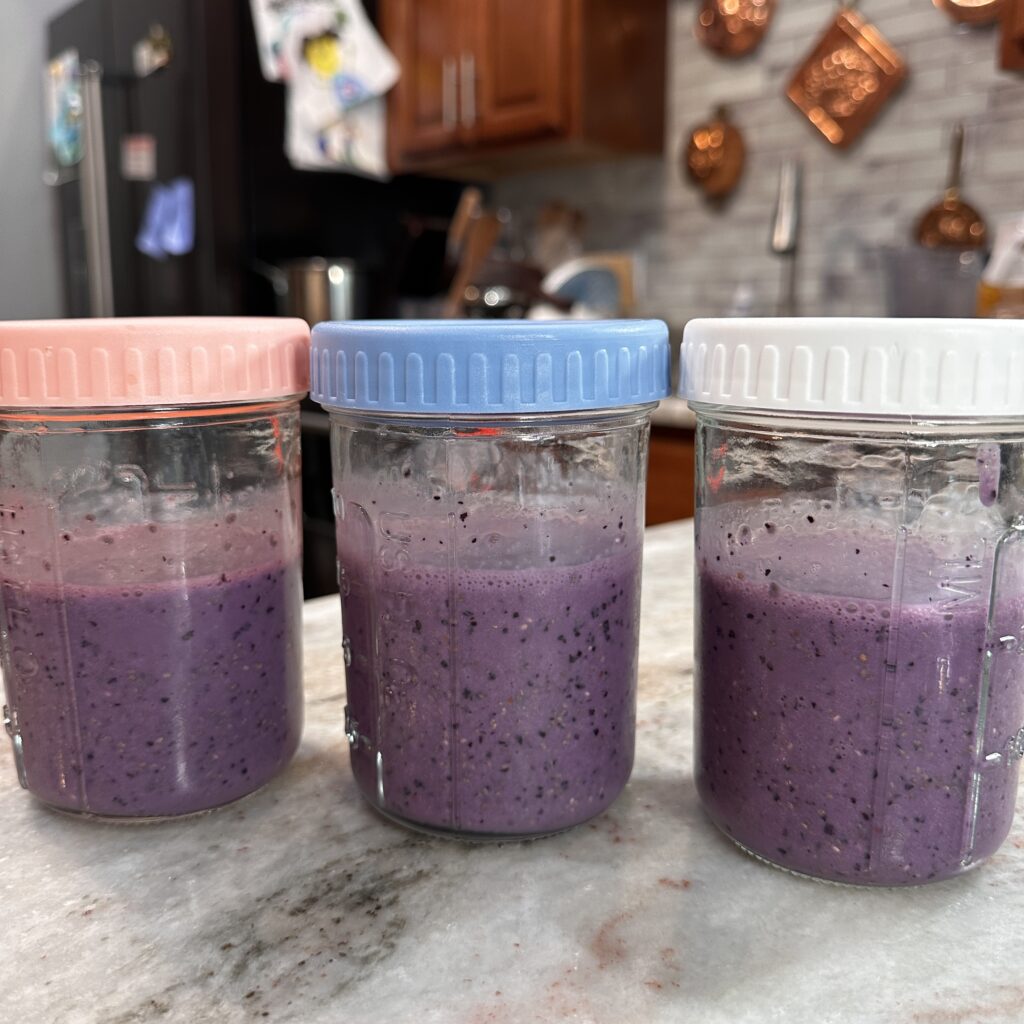
Blueberry Chia Pudding
Okay, you guys already know that chia pudding is one of my go-to make-ahead breakfasts because it’s so simple, nutrient-dense, and so customizable. Plus, it’s such an easy way to boost your fiber intake for the day.
This blueberry version blends milk and frozen blueberries into a smooth base, then gets thickened with chia seeds overnight. In the morning, all you have to do is grab a jar and top it with yogurt, nuts, or fresh fruit.
Grocery List
- Frozen blueberries
- Milk of choice (dairy or non-dairy)
- Chia seeds
- Optional toppings: Greek yogurt, nuts, fresh berries
Serves
3 jars (about 1 serving per jar)
Ingredients
- 1 ½ cups milk of choice
- 1 cup frozen blueberries
- 6 tablespoons chia seeds (2 tablespoons per jar)
- Optional for serving: dollop of Greek yogurt, handful of nuts, fresh berries
Instructions
- In a high-speed blender, combine the milk and frozen blueberries. Blend until completely smooth.
- Pour the blueberry milk into three jars, dividing evenly.
- Add 2 tablespoons of chia seeds into each jar and stir well.
- Cover and refrigerate for at least 4 hours, preferably overnight, until thickened.
- When ready to serve, top with Greek yogurt, nuts, and fresh berries if desired.
Why I Love This Recipe as a Dietitian
Chia pudding is such a nutrient powerhouse. The chia seeds bring in plant-based omega-3s, fiber, and protein, while the blueberries add antioxidants and natural sweetness. It’s a quick way to build a balanced breakfast that supports stable energy and satiety.
Customization & Tips
- Try almond milk for a lighter option or whole milk for extra creaminess.
- Swap blueberries for strawberries, mango, or even a mix of berries.
- For more sweetness, stir in a drizzle of honey or maple syrup before refrigerating.
- Make a bigger batch to last the entire week.
Nutrition Info (per jar, without toppings – estimated)
- Calories: ~150
- Protein: ~5g
- Carbohydrates: ~20g
- Fiber: ~8g
- Fat: ~6g
- Omega-3s: ~3g
Storage & Reheating
- Store: Keep sealed in the refrigerator for up to 5 days.
- Reheating: Not needed — enjoy chilled. If pudding thickens too much, stir in a splash of milk before eating.
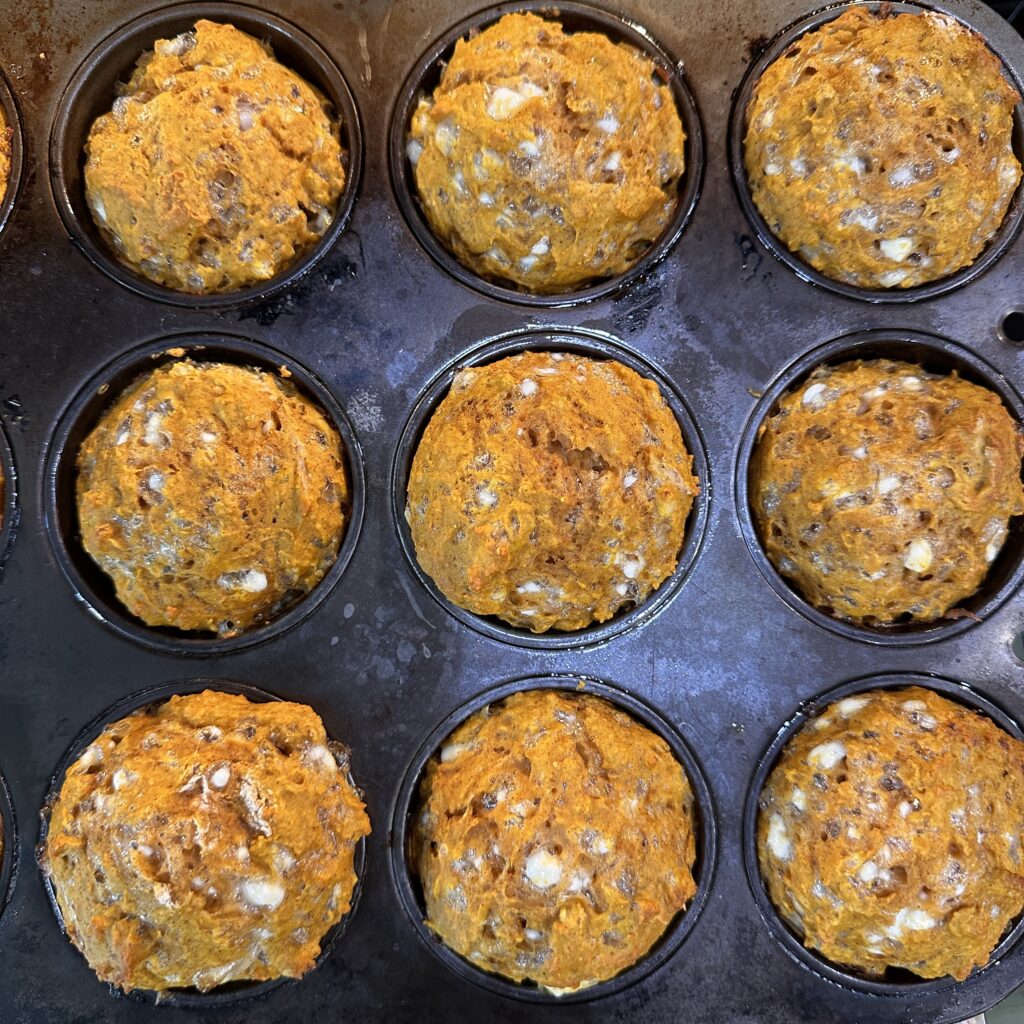
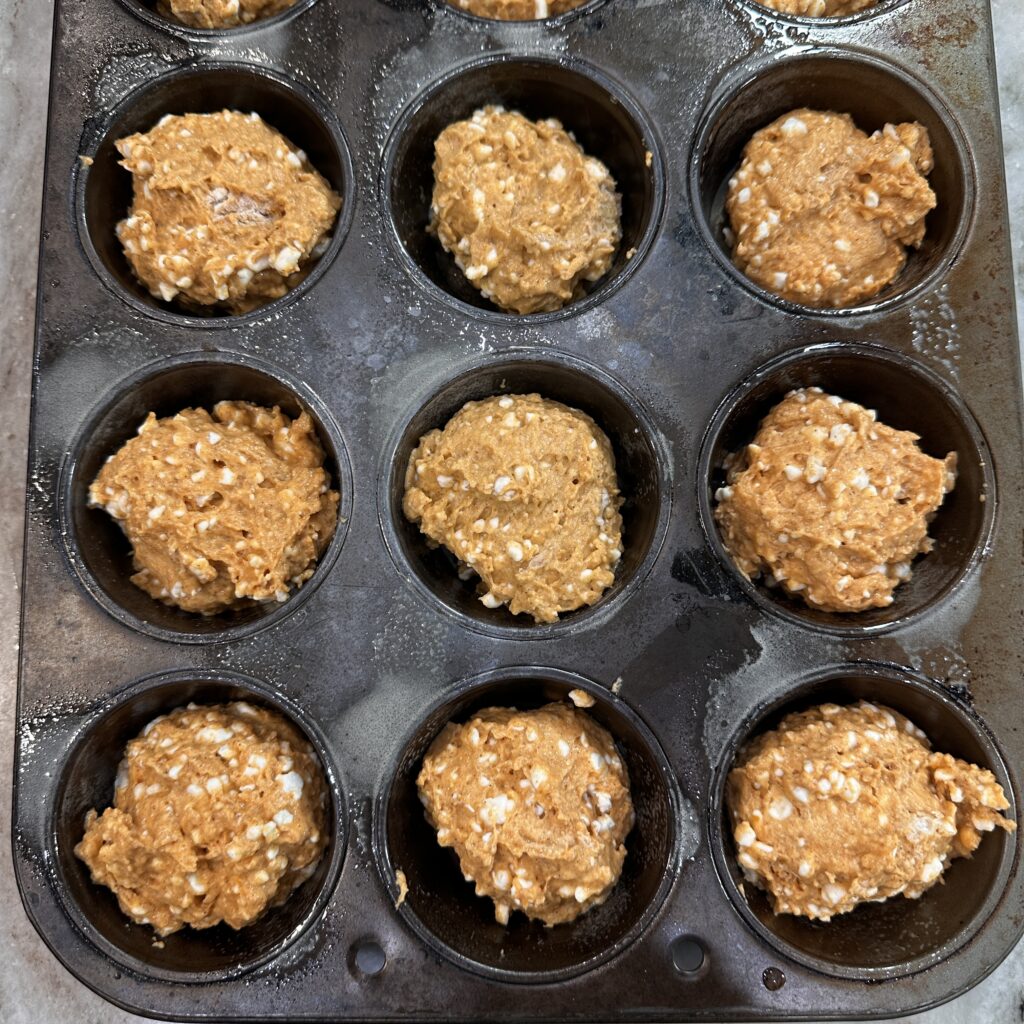
High Protein Pumpkin Muffins
These muffins are cozy, high in protein, and perfect for meal prep. The pumpkin keeps them moist, the cottage cheese or Greek yogurt adds a boost of protein, and the warm spices make them taste like fall in every bite. I love having a batch ready for easy grab-and-go breakfasts or snacks during the week.
Grocery List
- All-purpose flour
- Pumpkin puree
- Cottage cheese or Greek yogurt
- Eggs
- Pumpkin pie spice
- Cinnamon
- Baking powder
- Baking soda
- Dark chocolate chips (optional but recommended)
Serves
12 muffins
Ingredients
- 1 ¼ cup all-purpose flour
- 1 cup pumpkin puree
- ¾ cup cottage cheese (blended until smooth) or Greek yogurt
- 2 large eggs
- ½ teaspoon pumpkin pie spice
- 1 teaspoon cinnamon
- 1 teaspoon baking powder
- 1 teaspoon baking soda
- ½ cup dark chocolate chips, optional (reserve some for topping)
Instructions
- Preheat oven to 350°F. Line a muffin tin with 12 liners and lightly grease.
- In a large mixing bowl, whisk together the flour, pumpkin pie spice, cinnamon, baking powder, and baking soda.
- In a blender, combine pumpkin puree, cottage cheese (or Greek yogurt), and eggs. Blend until smooth so the cottage cheese fully incorporates into the batter.
- Pour the wet mixture into the dry ingredients. Stir gently until just combined — do not overmix.
- Fold in the chocolate chips, reserving a few for topping.
- Divide the batter evenly into the 12 muffin liners. Sprinkle remaining chocolate chips on top.
- Bake for 25–30 minutes, or until a toothpick inserted into the center comes out clean.
- Let cool for 10 minutes before removing from the pan. Enjoy warm or at room temperature.

Why I Love This Recipe as a Dietitian
These muffins check all the boxes: protein from cottage cheese or Greek yogurt, fiber and vitamin A from pumpkin, and just the right amount of sweetness. They’re more balanced than a traditional muffin, making them a smart choice for steady energy and keeping you full between meals.
Customization & Tips
- For extra protein, use blended 4% cottage cheese instead of Greek yogurt. It makes the muffins extra creamy without changing the flavor.
- Swap dark chocolate chips for walnuts or pecans if you want more crunch and healthy fats.
- Add a scoop of vanilla protein powder and reduce the flour slightly for an even higher protein boost.
- Make them mini muffins for kids’ lunchboxes or snacks.
Nutrition Info (per muffin – without chocolate chips, estimated)
- Calories: ~110
- Protein: ~10g
- Carbohydrates: ~14g
- Fiber: ~2g
- Fat: ~3g
Storage & Reheating
- Store: Keep in an airtight container at room temperature for up to 2 days, or refrigerate for up to 5 days.
- Freeze: Freeze individually wrapped muffins for up to 3 months.
- Reheating: Warm in the microwave for 15–20 seconds or enjoy at room temp.
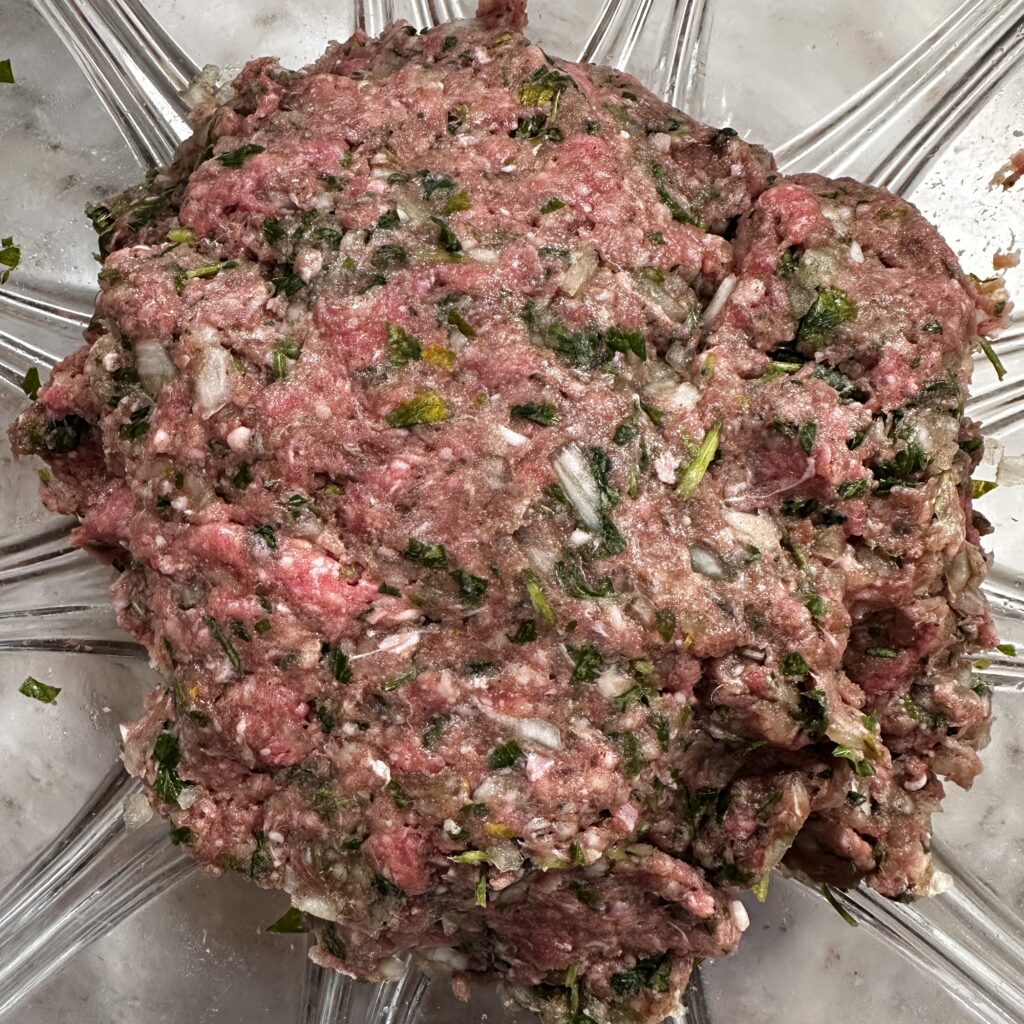
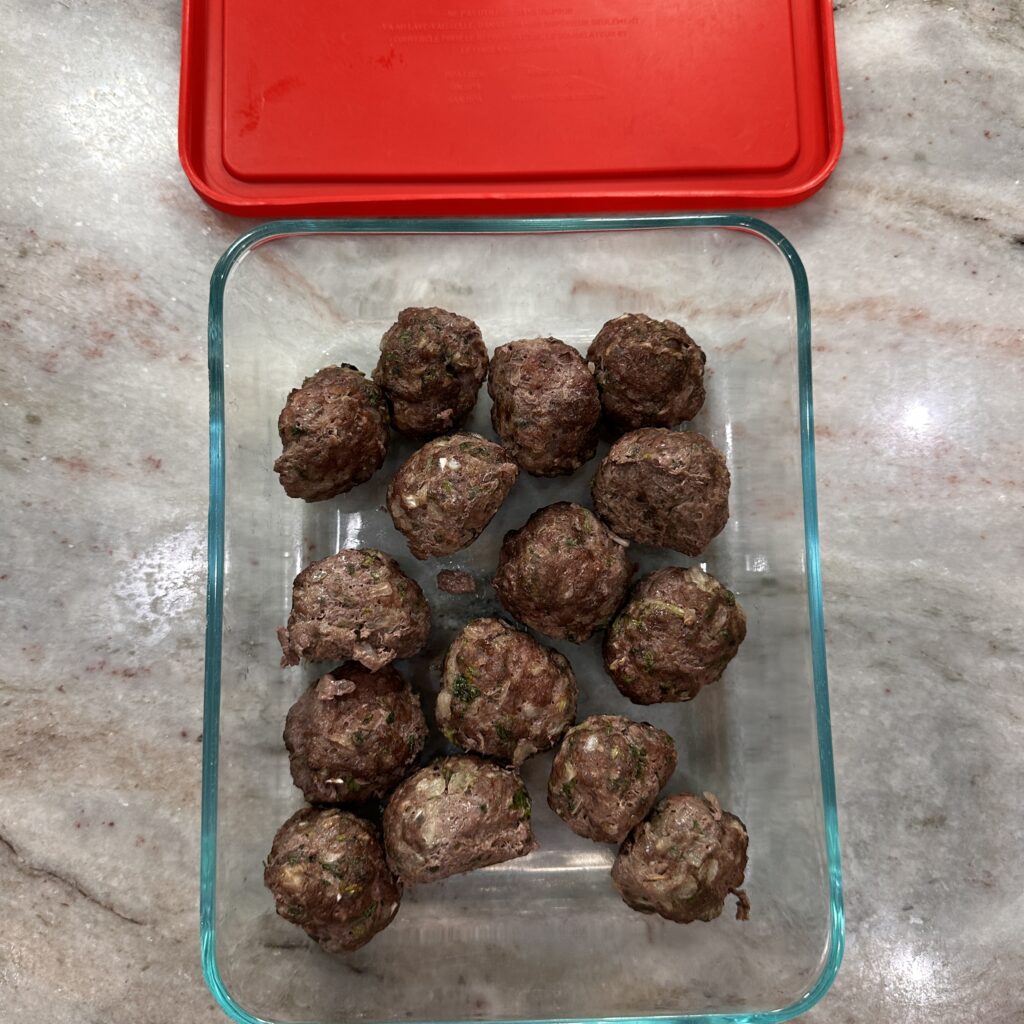
Kafta Meatballs
Kafta is a Middle Eastern favorite in my house. These meatballs are packed with fresh parsley, onion, and warm spices, making them flavorful, juicy, and perfect for meal prep. I love baking a big batch to use throughout the week — they pair easily with grain bowls, salads, or tucked into pita with a dollop of hummus or tzatziki.
Grocery List
- Ground beef
- Onion
- Italian parsley
- Salt
- Cinnamon
- Seven spice (or allspice blend if you can’t find it)
- Nutmeg
- Black pepper
Serves
About 4 servings (makes ~20 meatballs, depending on size)
Ingredients
- 1 pound ground beef
- 2 cups chopped onion
- 1 bunch Italian parsley, chopped
- ¾ teaspoon salt
- ½ teaspoon cinnamon
- ½ teaspoon seven spice
- ¼ teaspoon black pepper
Instructions
- Preheat oven to 400°F and line a baking sheet with parchment paper.
- In a food processor, pulse the parsley and onion until finely chopped but not blended into a paste. You should still see small pieces.
- Add the parsley-onion mixture to the ground beef. Sprinkle in salt, cinnamon, seven spice, and black pepper. Mix gently with your hands until well combined.
- Roll into meatballs (about 1 ½ tablespoons each) and place on the prepared baking sheet.
- Bake for 18–22 minutes, or until cooked through and lightly browned. Internal temperature should reach 160°F.
- Serve warm, or let cool and store for meal prep.

Why I Love This Recipe as a Dietitian
These meatballs are high in protein and full of herbs and spices that bring both flavor and antioxidants. They’re versatile, nutrient-dense, and more balanced than a traditional meatball recipe since the parsley and onion add fiber and micronutrients.
Customization & Tips
- Use half beef and half ground lamb for a richer flavor.
- Serve with a tahini sauce, tzatziki, or even over rice with a fresh cucumber-tomato salad.
- Make them into patties if you’d prefer kafta-style burgers or skewers.
- Don’t overmix the meat — this keeps the meatballs tender.
Nutrition Info (per meatball – estimated, based on 20 meatballs)
- Calories: ~60
- Protein: ~5g
- Carbohydrates: ~1g
- Fat: ~4g
- Fiber: <1g
Storage & Reheating
- Store: Refrigerate in an airtight container for up to 4 days.
- Freeze: Freeze cooked meatballs on a baking sheet, then transfer to a bag or container for up to 3 months.
- Reheating: Warm in the microwave, skillet, or oven until heated through.
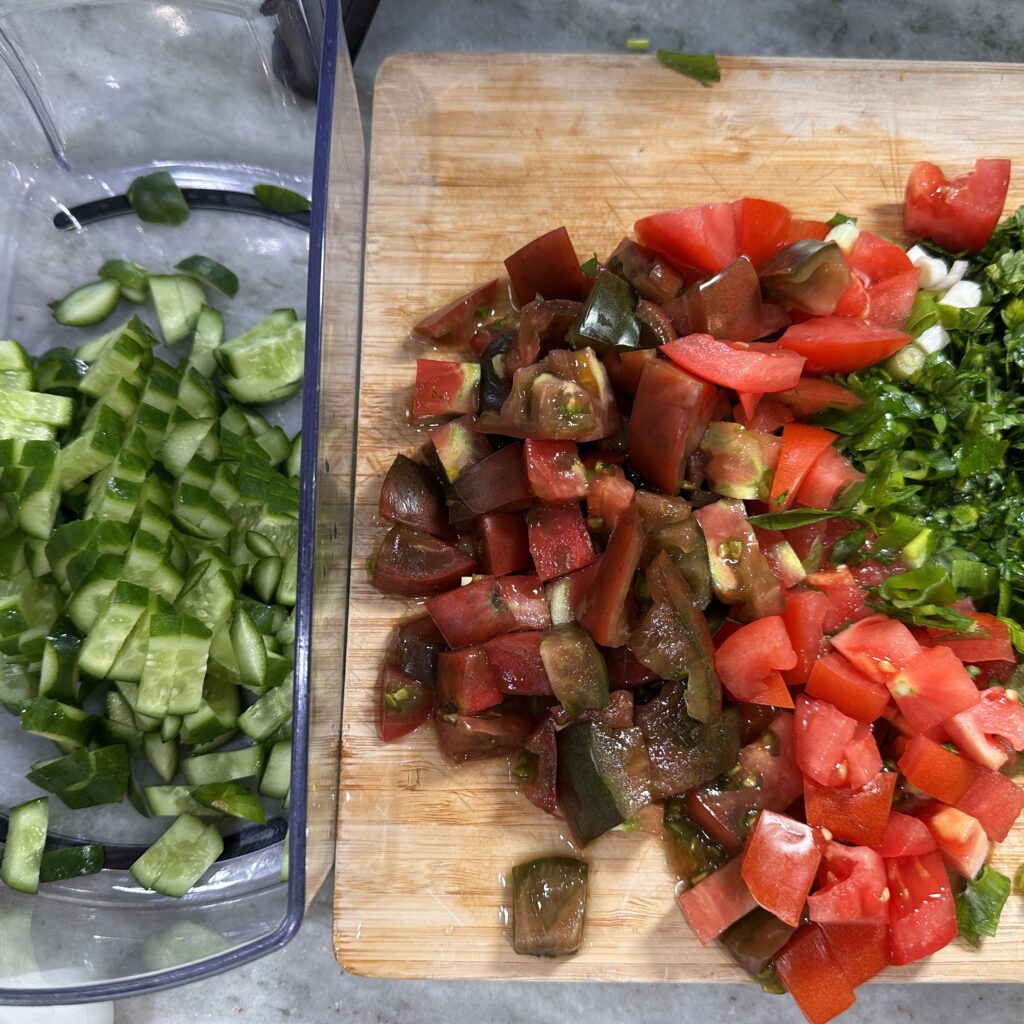
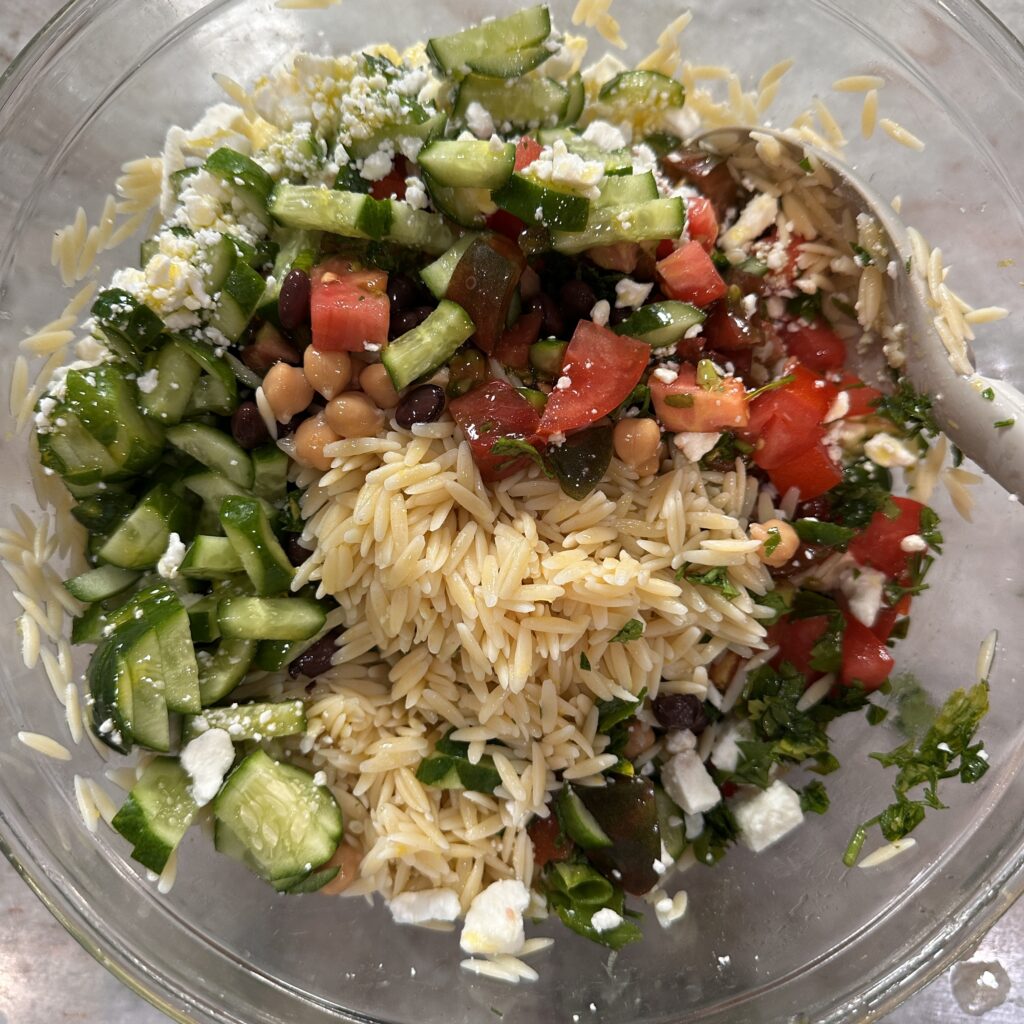
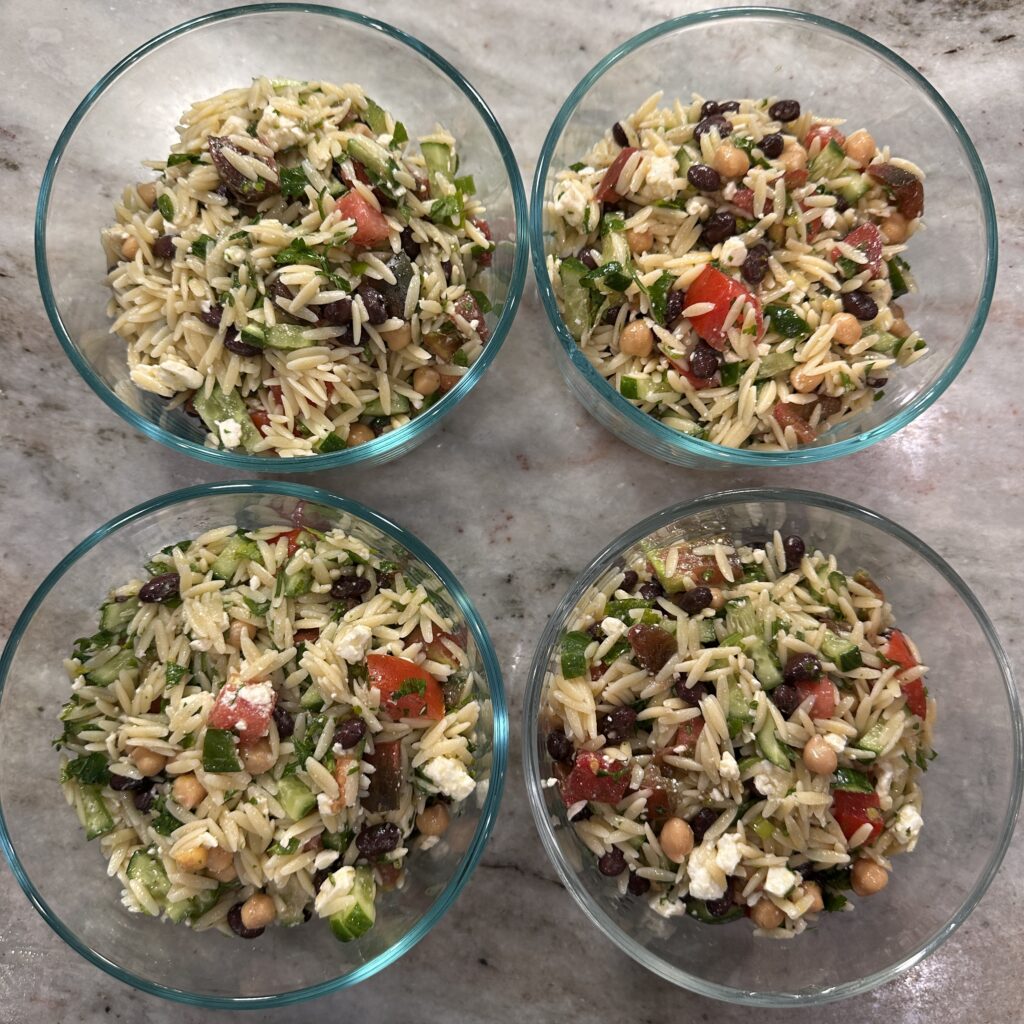
High Protein Mediterranean Orzo Salad
This Mediterranean orzo salad is hearty enough to be a full meal but light and refreshing at the same time. Using Barilla Protein+ orzo makes it higher in protein and fiber, which is a simple swap that turns a classic side dish into a balanced main. The lemony base infuses flavor right into the pasta, and the mix of beans, veggies, and feta adds color, texture, and nutrition.

Grocery List
- Barilla Chickpea Orzo (or other high-protein pasta)
- Lemon
- Mini cucumbers
- Cherry tomatoes
- Green onions
- Italian parsley
- Garbanzo beans (canned)
- Black beans (canned)
- Feta cheese
- Olive oil
- Salt
Serves
6–8 servings
Ingredients
- 1/2 box Barilla Chickpea Orzo
- Zest and juice of 1 lemon
- 2 mini cucumbers, diced
- 1 cup cherry tomatoes, halved
- 3 green onions, thinly sliced
- ½ bunch Italian parsley, chopped
- 1 can garbanzo beans, drained and rinsed
- 1 can black beans, drained and rinsed
- ½ cup feta cheese, crumbled
- 3 tablespoons olive oil
- Salt, to taste
Instructions
- Cook the orzo according to package instructions until al dente. Drain and transfer to a large mixing bowl.
- While still warm, stir in lemon zest and juice. Let sit until the orzo cools to room temperature so it soaks up the lemon flavor.
- Once cooled, add cucumbers, tomatoes, green onions, parsley, garbanzo beans, black beans, and feta.
- Drizzle with olive oil and season with salt to taste. Toss well until everything is evenly combined.
- Divide into 4-5 meal prep containers.
Why I Love This Recipe as a Dietitian
This salad is packed with plant-based protein and fiber from the beans and the high-protein orzo. The combination helps with satiety, blood sugar balance, and digestive health. Plus, the veggies bring in antioxidants and micronutrients, making it a nutrient-dense option for lunch or dinner.
Customization & Tips
- Add kalamata olives for extra Mediterranean flavor.
- Swap the black beans for lentils or edamame if you prefer.
- Use whole wheat orzo if you don’t have access to protein pasta.
- Make it dairy-free by omitting the feta or replacing it with a dairy-free cheese alternative.
Nutrition Info (per serving – estimated, based on 6 servings)
- Calories: ~320
- Protein: ~15g
- Carbohydrates: ~45g
- Fiber: ~10g
- Fat: ~9g
Storage & Reheating
- Store: Refrigerate in an airtight container for up to 4 days.
- Reheating: Best enjoyed cold or at room temperature — no need to reheat.
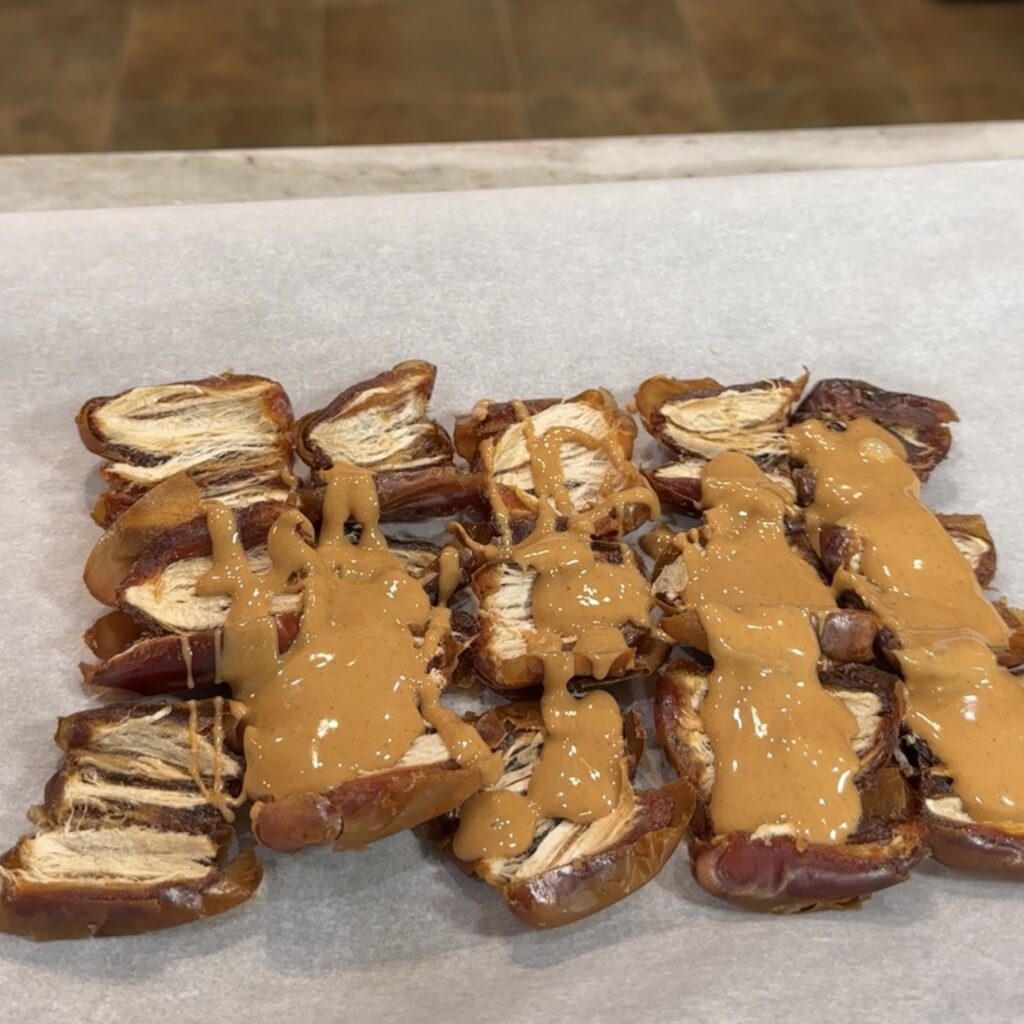
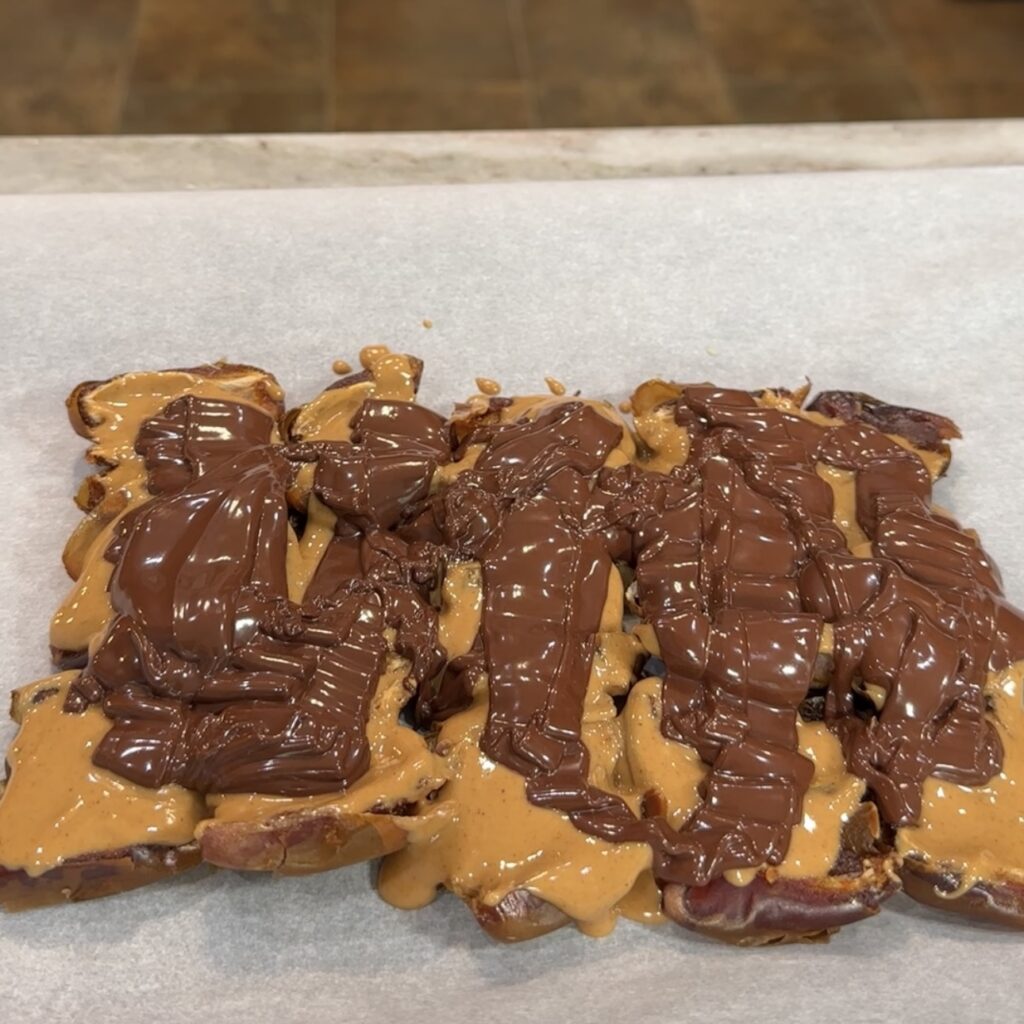
Date Snickers Bars
These homemade “Snickers” bars are such a fun, better-for-you treat. They are definitely on the more indulgent side since dates and chocolate do make this higher in sugar than my usual snack recipes — but that’s okay every once in a while. Some days you just need something a little extra sweet and satisfying, and this absolutely hits the spot.
The bonus is that even though they’re sweet, they still offer more nutrition than a traditional candy bar. Dates bring in fiber and antioxidants, nut butter adds protein and healthy fats, and dark chocolate gives you that rich flavor along with minerals and flavonoids. It’s a little indulgence with a bit more balance.
Grocery List
- Medjool dates
- Nut butter of choice (peanut, almond, or cashew)
- Chocolate chips
- Coconut oil
Serves
6 bars
Ingredients
- 12 Medjool dates, pitted
- ½ cup nut butter of choice (slightly warmed)
- 1 cup chocolate chips
- 1 teaspoon coconut oil
Instructions
- Line a small tray or plate with parchment paper.
- Pit the dates and lay them flat on the parchment. Press down gently so they open up slightly.
- Warm the nut butter in the microwave in 10-second increments until soft and spreadable.
- Spoon nut butter into each date, pressing it down slightly.
- In a microwave-safe bowl, combine chocolate chips and coconut oil. Microwave for about 40 seconds, stirring halfway, until smooth and melted.
- Drizzle the melted chocolate over the stuffed dates.
- Place the tray in the freezer for about 20–30 minutes, or until the chocolate is hardened.
- Once set, cut into 6 bar-sized pieces. Transfer to the refrigerator for storage.
Why I Love This Recipe as a Dietitian
This recipe satisfies a sweet tooth while still providing fiber, healthy fats, and natural sweetness. Dates are rich in potassium and antioxidants, nut butter adds protein and satiety, and dark chocolate brings in additional minerals and flavonoids. It’s a more balanced way to enjoy dessert.
Customization & Tips
- Use almond or cashew butter if you want a milder flavor, or peanut butter for a classic Snickers vibe.
- Sprinkle flaky sea salt on top of the chocolate before freezing for a salty-sweet finish.
- Try using dark chocolate for less sugar and a richer flavor.
- Double the batch — they disappear quickly.
Nutrition Info (per bar – estimated, based on 6 servings)
- Calories: ~220
- Protein: ~5g
- Carbohydrates: ~26g
- Fiber: ~4g
- Fat: ~12g
Storage & Reheating
- Store: Keep in the refrigerator in an airtight container for up to 1 week.
- Freeze: Freeze for up to 2 months. Let sit at room temperature for a few minutes before enjoying.
- Reheating: Not needed. Best served chilled.
Wrap-up
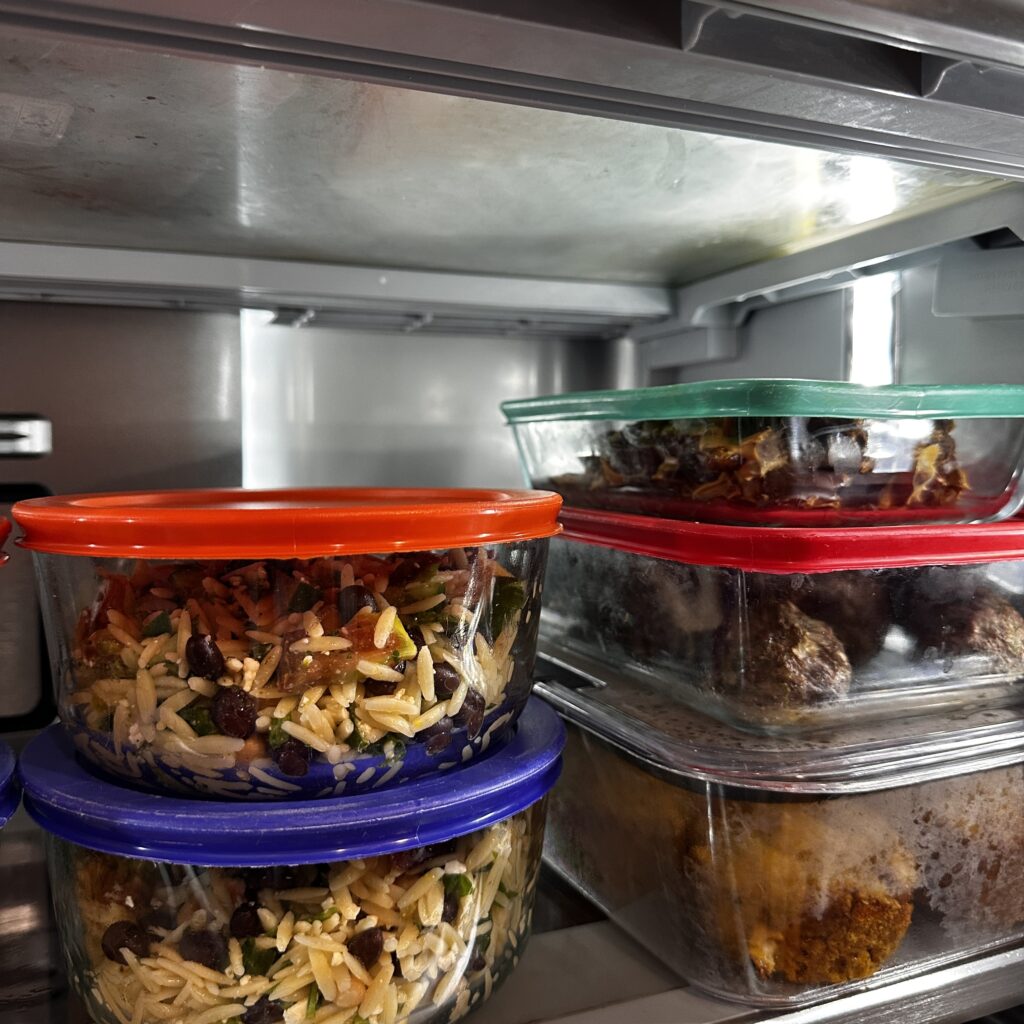
That’s everything I prepped this week, and it already feels so good to have the fridge stocked with balanced meals and snacks. Having a mix of breakfast options, easy protein, a hearty salad, and a little something sweet makes the week ahead feel much more manageable. Meal prep doesn’t have to be complicated or take up your entire Sunday — just a few simple recipes can set you up for success.
I hope these ideas inspire you to try something new in your own kitchen this week. If you make any of these recipes, tag me on Instagram and let me know how they turn out or what swaps you make — I always love seeing your variations.
Until next week, happy cooking and happy prepping!
Please can you share gluten free options for your baked goods please for coeliacs? Thank you!
I found your reel on Instagram and absolutely love these recipes! Going to give this one a go for our busy family of 5. Glad to see there’s more Sunday prep posts to follow. I’m confident in the kitchen but definitely in a rut!