
Hi friends!
So sorry I missed last week’s meal prep — I was in Nashville for FNCE 2025, and it was incredible. It’s always so inspiring to be surrounded by so many passionate dietitians, food lovers, and wellness experts all in one place. I met so many new friends and reconnected with old ones, and honestly, my heart (and stomach) are full. Between the sessions, the food scene, all the events, and a little bit of much-needed girl time, it was exactly what I needed to recharge and get re-inspired in the kitchen.
I came home feeling so motivated to dive back into my Sunday prep routine and share new ideas with you all.

So for this week’s Sunday Meal Prep, here’s what’s on the menu:
- Blended Chocolate Overnight Oats
- Protein Egg and Cheese Bagels
- Easy Healthy Lasagna
- Broccoli Cucumber Chicken Salad
- Homemade Snickers Bars
Let’s get into it!
Kitchen Tools/ Equipment/ Containers I used:
- 2026 planner
- Large Blender
- Glass Measuring Cup
- Chia seed pudding jars
- Baking dish 9×9
- Chef’s knife
- Wood cutting board
- Veggie chopper
- Veggie saute pan
- White round baking dish with handles
- Mortar and pestle (similar)
- glass mixing bowl
- Chicken salad meal prep containers
- Food processor
- Loaf pan
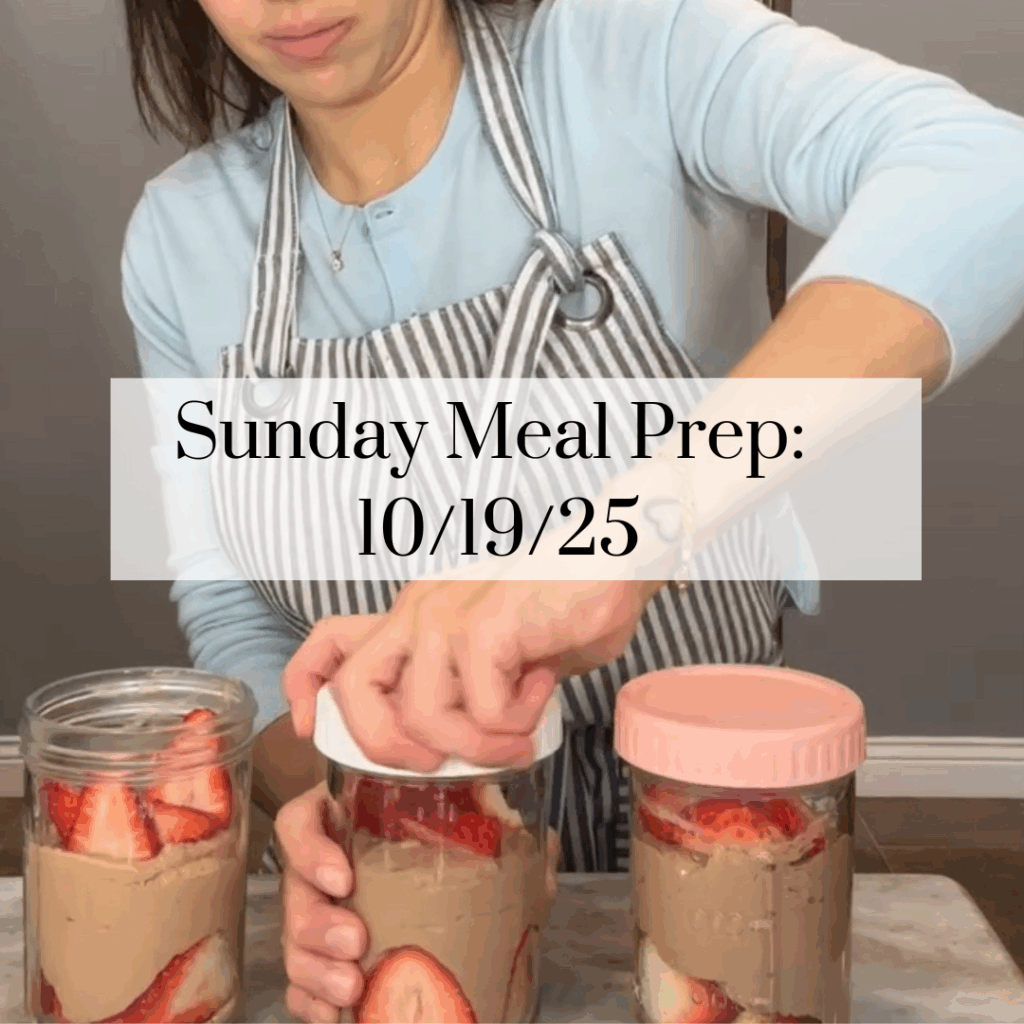
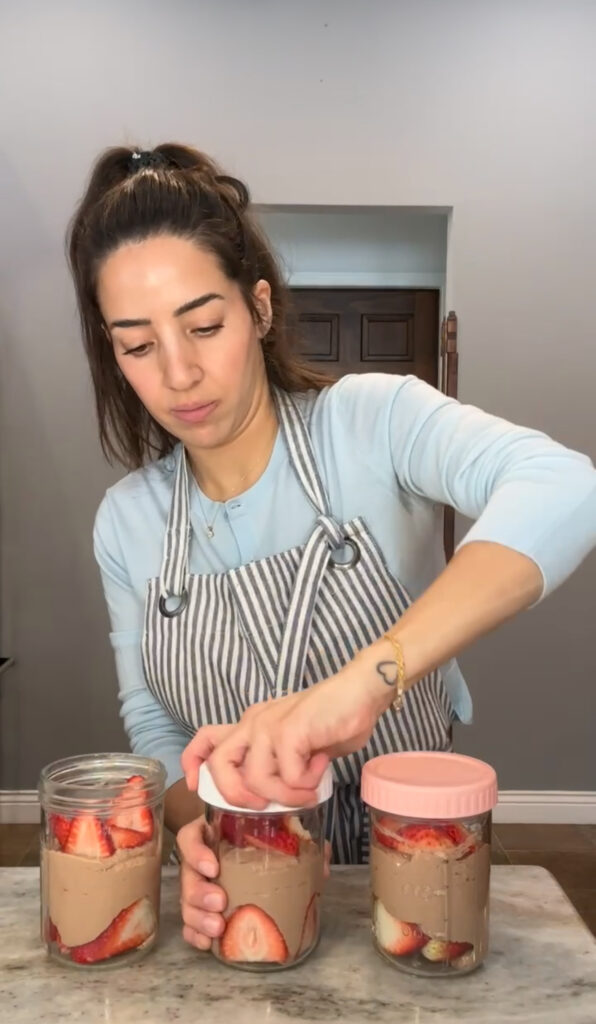
Blended Chocolate Overnight Oats
These Blended Chocolate Overnight Oats are the perfect mix of creamy, chocolatey, and high-protein goodness — perfect for busy mornings or a quick grab-and-go breakfast.
I sometimes forget how easy tofu is to use, but it’s truly a secret weapon for adding smoothness and protein without any extra effort. When blended with Greek yogurt, cocoa powder, and oats, it creates a pudding-like texture that feels indulgent but is packed with nutrients.
Layered with fresh strawberries, it’s the kind of meal prep breakfast that tastes like dessert but keeps you energized and satisfied all morning long.
Grocery List
- Old-fashioned rolled oats
- Cocoa powder
- Chia seeds
- Vanilla extract
- Greek yogurt
- Silken or soft tofu
- Maple syrup
- Milk of choice (I used 2%)
- Fresh strawberries
Serves
4
Ingredients
- 1 ½ cups old-fashioned rolled oats
- 2 tablespoons unsweetened cocoa powder
- 2 tablespoons chia seeds
- 1 teaspoon pure vanilla extract
- 3/4 cup plain nonfat Greek yogurt
- ½ cup silken tofu
- 3 tablespoons pure maple syrup
- 2 cups milk of choice
- 1 ½ cups sliced strawberries (for layering)
Instructions
- In a high-speed blender, combine oats, cocoa powder, chia seeds, vanilla extract, Greek yogurt, tofu, maple syrup, and milk.
- Blend on high until completely smooth and creamy, about 30–45 seconds. The texture should be thick but pourable.
- Taste and adjust sweetness as needed — you can add a bit more maple syrup or a dash of salt to balance the flavors.
- Pour the mixture evenly into four glass jars or containers.
- Layer sliced strawberries between the blended oat mixture for a little freshness and texture.
- Cover and refrigerate for at least 4 hours or overnight.
- In the morning, stir and enjoy chilled.
Why I Love This Recipe (As a Dietitian)
This recipe is everything I love in a make-ahead breakfast — high in protein, balanced in carbs and fiber, and full of flavor. The combination of Greek yogurt and tofu gives it a creamy, pudding-like texture while boosting protein and calcium. The oats, chia seeds and strawberries add fiber for steady energy and antioxidants. It’s a satisfying and blood-sugar-friendly breakfast that keeps you full for hours.
Customization & Tips
- Dairy-Free: Use a plant-based yogurt (like almond or soy) and non-dairy milk.
- Texture: If you prefer thicker oats, reduce milk by ¼ cup. For thinner consistency, add more milk before serving.
Nutrition Information (per serving)
Approximate values
- Calories: 310
- Protein: 20g
- Carbohydrates: 35g
- Fiber: 6g
- Fat: 8g
Storage & Reheating
Store in airtight jars or containers in the fridge for up to 4 days. These oats are best enjoyed cold, but if you prefer them warm, microwave for 30–45 seconds, then stir and top with extra strawberries.
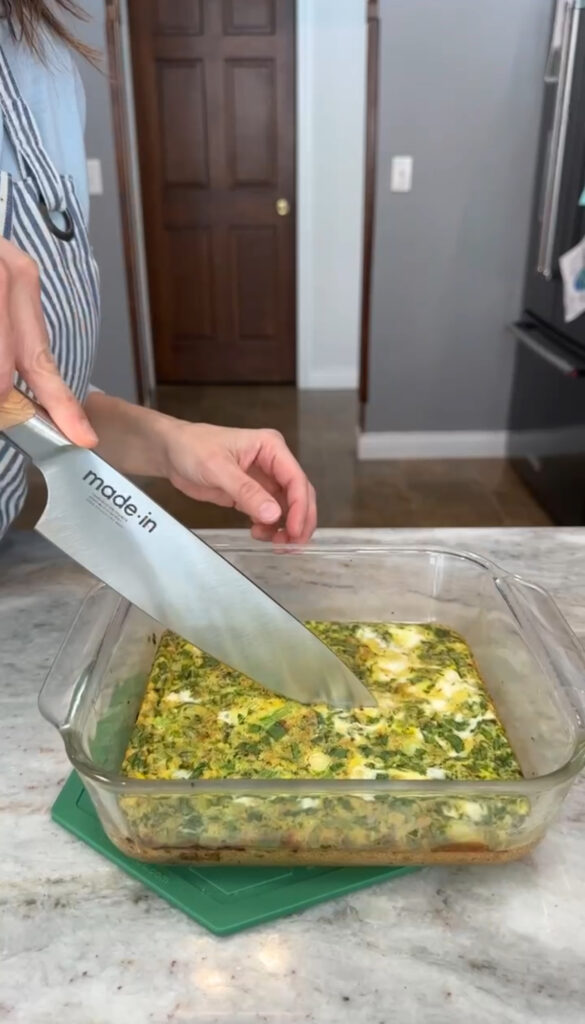
High-Protein Egg and Cheese Bagels
If you love a warm, cheesy breakfast sandwich but want something balanced and freezer-friendly, these High-Protein Egg and Cheese Bagels are going to be your new favorite meal prep recipe. The baked egg frittata is fluffy and flavorful thanks to fresh herbs and a little spice from chili flakes, and it pairs perfectly with melty cheddar on a toasted protein bagel. They’re satisfying, portable, and ready in minutes on busy mornings.
Grocery List
- Protein bagels (such as Dave’s Killer Bread or another high-protein brand)
- Cheddar cheese slices
- Eggs
- Fresh parsley
- Spring onion (green onion)
- Salt, black pepper, chili flakes
Serves
4
Ingredients
- 4 protein bagels
- 4 slices sharp cheddar cheese
- 5 large eggs
- 1 small handful fresh parsley, finely chopped (about 2 tablespoons)
- 1 spring onion, diced
- ¼ teaspoon salt
- ¼ teaspoon black pepper
- ⅛ teaspoon chili flakes (optional)
Instructions
- Preheat oven to 375°F (190°C). Lightly grease an 8×8-inch nonstick baking dish.
- In a medium bowl, whisk together eggs, parsley, spring onion, salt, pepper, and chili flakes.
- Pour the mixture into the prepared baking dish and bake for 10–12 minutes, or until eggs are fully set.
- Let cool slightly, then cut into 4 equal squares.
- Slice the bagels in half and layer each with 1 slice of cheddar cheese and 1 square of the egg frittata.
- Wrap each sandwich tightly in parchment paper or foil.
- Freeze for up to 3 months.
To serve, thaw overnight in the refrigerator, then warm in the air fryer or oven until hot and the cheese is melted.
Why I Love This Recipe (As a Dietitian)
These sandwiches are the perfect mix of convenience and nutrition. Each one delivers a good balance of protein, healthy fats, and fiber to keep you satisfied all morning long. Using high-protein bagels and eggs makes this a nourishing option that still feels indulgent.
Customization & Tips
- Add veggies: Mix in chopped spinach, bell pepper, or mushrooms for extra nutrients.
- Switch up the cheese: Try Swiss, mozzarella, or pepper jack for different flavors.
- No protein bagels? Use whole-grain or sprouted bagels.
- Spice lovers: Add a dash of hot sauce or smoked paprika to the egg mixture.
Nutrition Information (per sandwich)
Approximate values
- Calories: 340
- Protein: 28g
- Carbohydrates: 28g
- Fiber: 4g
- Fat: 12g
Storage & Reheating
- Refrigerate: Store in an airtight container for up to 4 days.
- Freeze: Wrap individually and store up to 3 months.
- Reheat: Air fry or bake at 350°F for 6–8 minutes, or until warmed through and cheese is melted.
Easy Healthy Lasagna (High-Protein & Veggie-Packed)
This lasagna is cozy, hearty, and packed with protein and veggies, perfect for these colder months. It’s the kind of meal that feels indulgent but is secretly balanced and nourishing. I love how the blended vegetable and cheese mixture sneaks in so many nutrients and veggies while keeping everything creamy and flavorful. It’s perfect for meal prep, family dinners, or freezing for later.

Grocery List
- Olive oil
- Yellow onion
- Garlic
- Ground beef
- Fresh basil (or dried)
- Marinara or pasta sauce
- Carrot
- Yellow squash
- Zucchini
- Red bell pepper
- Spinach
- Ricotta cheese
- Cottage cheese
- Lasagna noodles (regular or oven-ready)
- Shredded mozzarella cheese
- Salt, pepper
Serves
8
Ingredients
Tomato & Beef Sauce
- 1 tablespoon olive oil
- 1 small onion, finely diced
- 4 cloves garlic, mashed or minced
- 1 pound ground beef (93% lean works best)
- 1 tablespoon fresh basil, sliced (or 1 teaspoon dried basil)
- 1 (24-ounce) jar marinara or pasta sauce
Vegetable & Cheese Mixture
- 1 teaspoon olive oil
- 1 medium carrot, diced
- ½ medium yellow squash, diced
- ½ medium zucchini, diced
- ½ medium red bell pepper, diced
- 1 ½ cups spinach
- 1 cup ricotta cheese
- 1 cup cottage cheese
For Assembly
- 12–14 lasagna sheets
- 3 cups shredded mozzarella cheese, divided
Instructions
- Preheat oven to 375°F (190°C).
- Make the Tomato & Beef Sauce:
Heat olive oil in a large skillet over medium-high heat. Add the diced onion and sauté for 3 minutes until translucent.
Add garlic and cook for another minute until fragrant.
Stir in ground beef and cook until browned, breaking it up into small pieces. Season with salt, pepper, and basil.
Pour in the marinara sauce, stir, and let simmer for 10–15 minutes to thicken and blend the flavors. - Make the Vegetable & Cheese Mixture:
In a separate pan, heat olive oil over medium heat. Add carrot, bell pepper, squash, and zucchini. Sauté for 5–6 minutes, until tender.
Add spinach and cook until slightly wilted.
Transfer everything to a blender. Add ricotta and cottage cheese. Blend until smooth and creamy. - Assemble the Lasagna:
Spread 1 cup of the meat sauce on the bottom of a 9×13-inch baking dish.
Layer with 3–4 lasagna sheets, then spread ⅓ of the vegetable-cheese mixture, ⅓ of the mozzarella, and ⅓ of the remaining meat sauce.
Repeat two more times. Finish with noodles topped with the remaining meat sauce and mozzarella cheese. - Bake:
Cover with foil and bake for 30 minutes. Remove foil and bake another 10 minutes, until cheese is golden and bubbly.
Let rest 15 minutes before slicing.
Why I Love This Recipe (As a Dietitian)
This lasagna delivers high-quality protein from lean beef, ricotta, and cottage cheese, plus blended veggies that add vitamins, minerals, and fiber. You get all the classic flavors without the heavy, greasy feel. It’s a great example of how you can lighten up traditional recipes while keeping them delicious and family-approved.
Customization & Tips
- Want it vegetarian? Skip the beef and use lentils or crumbled tofu.
- Add spice: Mix in red pepper flakes or Italian seasoning to the sauce.
- Noodle swap: Try whole-grain or chickpea lasagna sheets for extra fiber and protein.
- Batch tip: Double the recipe and freeze one for later — it reheats perfectly.
Nutrition Information (per serving)
Approximate values
- Calories: 390
- Protein: 32g
- Carbohydrates: 30g
- Fiber: 4g
- Fat: 14g
Storage & Reheating
- Fridge: Store leftovers in an airtight container up to 4 days.
- Freezer: Freeze cooked or uncooked lasagna up to 3 months.
- Reheat: Thaw overnight, then bake at 350°F until warmed through (about 25–30 minutes).
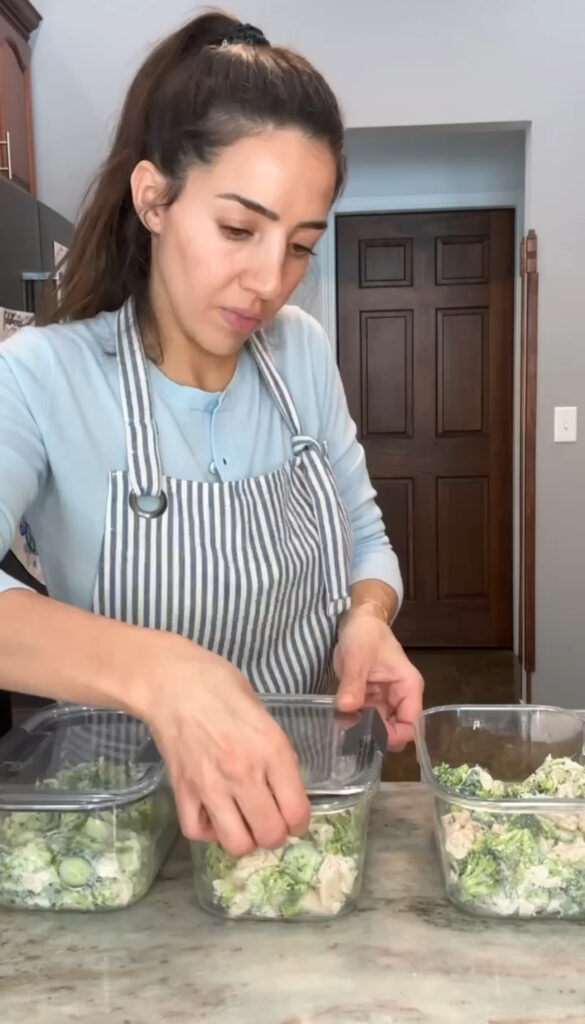
Easy Broccoli, Cucumber & Chicken Salad
This Easy Broccoli, Cucumber & Chicken Salad is one of those meals that checks all the boxes — fresh, crunchy, high-protein, and ready in minutes. It’s perfect for lunch meal prep or a quick weeknight dinner when you want something satisfying but light. The creamy garlic-labneh dressing ties everything together, and it’s even better the next day once the flavors have had time to mingle.
Grocery List
- Broccoli
- Mini cucumbers
- Chicken breasts or rotisserie chicken
- Garlic
- Labneh (I use Yaza Labneh) or Greek yogurt
- Mayonnaise
- Salt and pepper
Serves
4
Ingredients
- 8 ounces raw broccoli (about 2 small heads), finely chopped
- 4–5 mini cucumbers, finely chopped
- 2 cooked chicken breasts, chopped (about 2 cups; rotisserie chicken works perfectly)
For the Dressing
- 2–3 garlic cloves, mashed or finely grated
- 4 tablespoons labneh or plain Greek yogurt
- 2 tablespoons mayonnaise
- ½ teaspoon salt (adjust to taste)
- ¼ teaspoon black pepper
Instructions
- Prep the salad:
Finely chop the broccoli and cucumbers into small, bite-sized pieces. Add them to a large mixing bowl.
Chop or shred the cooked chicken and add it to the bowl. - Make the dressing:
In a small bowl, mash the garlic cloves, then mix in the labneh (or Greek yogurt), mayonnaise, salt, and pepper. Whisk or stir until smooth and creamy. - Assemble the salad:
Pour the dressing over the broccoli, cucumber, and chicken. Toss everything together until evenly coated. - Chill (optional):
For best flavor, refrigerate for at least 30 minutes before serving to let the dressing soak into the veggies.
Customization & Tips
- Protein options: Swap the chicken for tuna, shrimp, tofu, or chickpeas.
- Add-ins: Try mixing in diced avocado, a squeeze of lemon juice, or a sprinkle of feta cheese.
- Make it dairy-free: Use dairy-free yogurt and mayo alternatives.
- Crunch upgrade: Top with toasted almonds, sunflower seeds, or everything bagel seasoning.
Nutrition Information (per serving)
Approximate values
- Calories: 270
- Protein: 28g
- Carbohydrates: 6g
- Fiber: 2g
- Fat: 14g
Storage & Reheating
- Refrigerate: Store in an airtight container for up to 3 days.
- Reheat: Best served cold, but if using freshly cooked chicken, you can enjoy it slightly warm before mixing in the dressing.
Homemade Healthy Snickers Bars (No-Bake & Refined Sugar-Free)
These Homemade Healthy Snickers Bars are naturally sweetened, packed with real food ingredients, and have that perfect balance of chewy, nutty, and chocolatey layers. The date caramel tastes unbelievably close to the real thing, and the best part — they can sit in your freezer for whenever your sweet tooth hits.
Grocery List
- Medjool dates
- Natural peanut butter
- Vanilla extract
- Almond flour
- Roasted peanuts
- Dark chocolate chips or chunks
- Coconut oil
Serves
10–12 bars
Ingredients
For the Date Caramel
- 1 cup Medjool dates, pitted and soaked in warm water for 10 minutes
- 2 tablespoons natural peanut butter
- 1 teaspoon vanilla extract
- Pinch of salt
For the Nougat Layer
- 1 cup almond flour
- 3 tablespoons date caramel (from above)
- 2 tablespoons natural peanut butter
For Assembly
- ⅓ cup roasted peanuts
- 1 cup dark chocolate chips or chunks
- 1 teaspoon coconut oil
Instructions
- Make the Date Caramel:
Drain the soaked dates and add them to a blender or food processor with peanut butter, vanilla extract, and salt. Blend until smooth and creamy, scraping down the sides as needed. Set aside. - Make the Nougat Layer:
In a clean food processor, combine almond flour, 3 tablespoons of the date caramel, and peanut butter. Blend until a dough-like mixture forms — it should stick together when pressed. - Assemble the Bars:
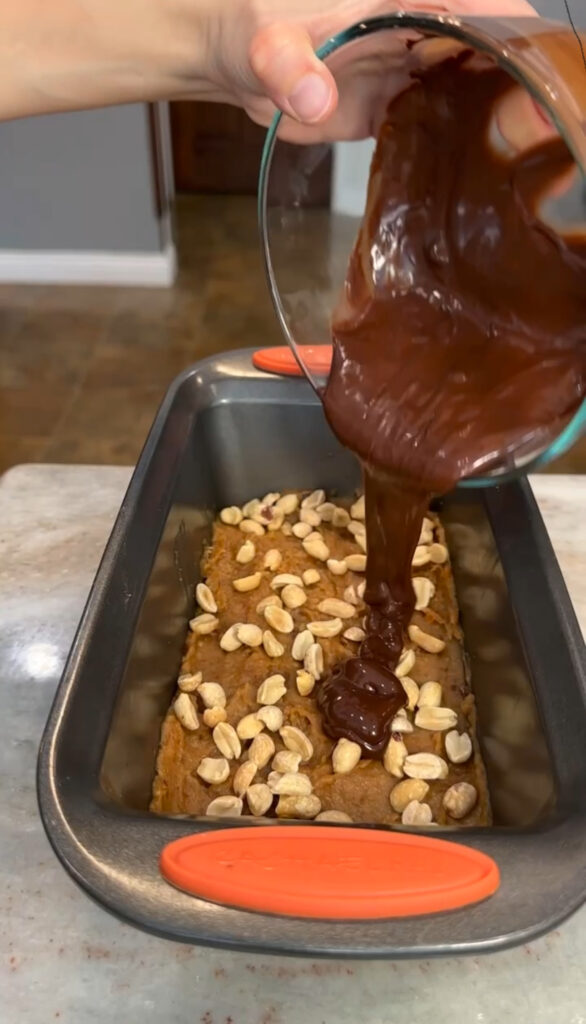
Line a loaf pan with parchment paper. Press the nougat mixture evenly into the bottom of the pan.
Spread a thick layer of the remaining date caramel over the nougat base, then gently press the peanuts into the caramel. - Add the Chocolate Layer:
Melt chocolate chips with coconut oil in a microwave-safe bowl or over a double boiler until smooth. Pour the melted chocolate over the top of the caramel layer and spread evenly. - Freeze:
Place in the freezer for at least 2–3 hours, or until firm.
Once set, remove from the pan, slice into bars, and store in an airtight container.
Why I Love This Recipe (As a Dietitian)
These bars prove you can enjoy dessert and still nourish your body. Made with real, whole ingredients — fiber-rich dates, healthy fats from nuts, and antioxidant-packed dark chocolate — they satisfy your sweet cravings without refined sugar or processed fillers. They’re a great option for an afternoon energy boost or a freezer-friendly treat to keep on hand.
Customization & Tips
- Nut-free version: Swap peanut butter for sunflower seed butter and use pumpkin seeds instead of peanuts.
- Add crunch: Stir in a few rice crisps or chopped almonds to the caramel layer.
- Storage tip: Slice before freezing so you can grab one whenever you need a little something sweet.
Nutrition Information (per bar)
Approximate values
- Calories: 210
- Protein: 6g
- Carbohydrates: 22g
- Fiber: 4g
- Fat: 11g
Storage & Reheating
- Freezer: Store in an airtight container for up to 3 months.
- Fridge: Keep up to 1 week, though they’re best enjoyed cold from the freezer for that classic chewy texture.
Wrap up
And that’s this week’s meal prep! A little mix of comfort and balance — something sweet, something savory, and plenty of fresh, nourishing meals to make the week feel just a bit easier. I love that every recipe this week can be made ahead, stored, and enjoyed without any stress, whether you’re running out the door in the morning or looking for a healthy dinner option midweek.
If you try any of these, I’d love to hear how they turn out — tag me on Instagram or share your meal prep photos so I can see what you’re cooking up!